Taste Testing Molten Cinnamon Rolls by Tasty

It’s Friday and time for another recipe you might want to try out this weekend…anything with molten in the title has to be good, right?

But first, a quick reminder I’m not a food blogger. There will be no flour-dusted cutting board photos in-between hefty paragraphs filled with adjectives. The word foodie sends an awful noise of nails on a chalkboard down my spine.

I only want to share the recipe and what I learned when baking or cooking it for the first time. The act of making food for others is how I show love, and it’s my fun time. Trying to make something for the first time is always exciting for me because you either nail it or you don’t.

Here we go:

THE RECIPE:

for 6 rolls

  • cinnamon roll dough, with icing
  • 8 oz

    cream cheese

  • ¼ cup

    granulated sugar

  • ½ teaspoon

    vanilla extract

  • ½ cup

    milk

  1. Preheat oven to 400°F (200°C)
  2. Take two cinnamon roll dough packs and press them flat into circles.
  3. For the filling: In a medium bowl, mix together the cream cheese, sugar, and vanilla, stirring until smooth.
  4. Add the milk and stir until there are no lumps.
  5. Freeze cream cheese mixture for about 1 hour until it sets and is frozen but not too hard.
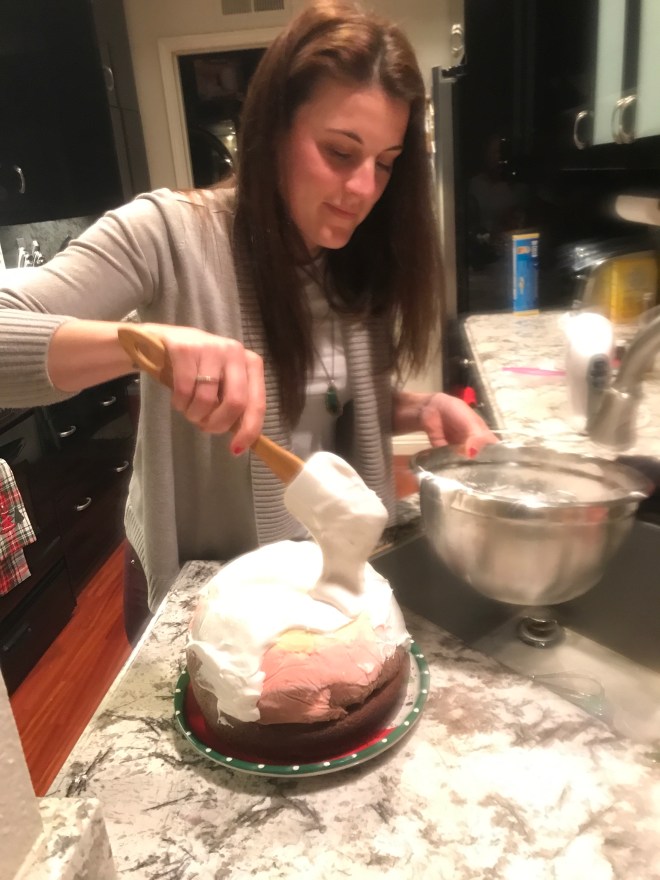
  6. Scoop out a large spoonful of the mixture and place it in the center of one of the cinnamon roll dough circles. Fold the edges of the dough up the sides of the cream cheese scoop.
  7. Place the other flattened dough circle on top, using a spoon to tuck the edges underneath. Repeat with the remaining dough and cream cheese.
  8. Place the sealed dough balls upside down in a 9×9 (23×23) cake pan with the seams facing upwards.
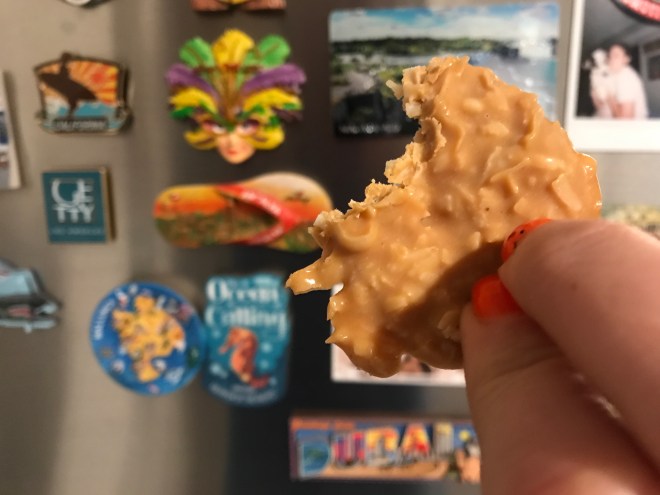
  9. Bake for 20–25 minutes until the rolls are golden brown and puffed. Drizzle the reserved icing on top of the rolls, and serve while warm.
  10. Enjoy!

MY FINDINGS:

  1. Don’t substitute almond milk for regular milk. It doesn’t mess with the taste of the cream cheese mixture but it does screw with the consistancy which makes it harder to handle when spreading it between the rolls.
  2. The tuck rule in step 7 is important. I forgot, and really wished I wouldn’t have…
  3. I used Philadelphia cream cheese, McCormick vanilla, Pillsbury (of course) cinnamon rolls, and Kroger sugar.

WOULD I MAKE IT AGAIN?

YES. The HUBS and everyone in the office who had the leftovers raved for more.

bb724de1-ba2b-4862-bf26-bf82556cc12a_dvd.original-1

Have you tried this recipe, too? What did you think about it? Tell in the comments, belowwwwwwww.

PSS: THE ORIGINAL RECIPE CAN BE FOUND HERE.
COME BE MY FRIEND ON INSTAGRAM. I’M HILARIOUS.
OR
BE MY PENPAL/DEAR DIARY SERIES 👇👇 & SIGN UP VIA THE LINK

https://bit.ly/2wMpE29

Taste Test: Upside Down Banana Bread Cinnamon Rolls

This Friday’s Taste Test recipe is Tasty’s upside down banana bread cinnamon rolls. How could I NOT make these? *In my Chandler Bing voice. Banana bread is my freaking favorite. I could eat a whole loaf with no guilt, seriously.

You know what banana flavor is awful? Can you guess? I’ll tell you at the end, think about it 😉 Anyways, will I love the shit out of this recipe because I love banana bread so much? Scroll to see if it made the cut!

But first, a quick reminder I’m not a food blogger. There will be no flour-dusted cutting board photos in-between hefty paragraphs filled with adjectives. The word foodie sends an awful noise of nails on a chalkboard down my spine.

I only want to share the recipe and what I learned when baking or cooking it for the first time. The act of making food for others is how I show love, and it’s my fun time. Trying to make something for the first time is always exciting for me because you either nail it or you don’t.

Here we go:

THE RECIPE:

1 cup whole milk

4 tablespoons unsalted butter, 1/2 stick

¾ oz instant yeast, 1 packet

⅓ cup granulated sugar

¼ teaspoon salt

3 ripe bananas, mashed 

4 ½ cups all-purpose flour, divided

2 tablespoons oil

FILLING

4 tablespoons unsalted butter, melted

¼ cup granulated sugar
1 tablespoon cinnamon
CARAMEL SAUCE 

½ cup unsalted butter, 1 stick

1 cup brown sugar

1 teaspoon salt

1 teaspoon vanilla

¼ cup honey

1 cup walnuts, chopped
  1. In a large, microwave-proof bowl, combine the milk and melted butter. Microwave for 40 seconds, until the milk mixture reaches 110˚F (45˚C). Add the yeast, then let sit for 10 minutes.
  2. Add the granulated sugar, salt, mashed bananas, and stir.
  3. Add 3½ cups (435 g) of flour, ½ cup (60 g) at a time, stirring between each addition.
  4. Transfer the dough to a floured surface and knead for 3 minutes, adding more flour ¼ cup (30 g) at a time if the dough is sticking to your hands or the surface. Form the dough into a ball.
  5. Add the oil to clean large bowl and place the dough in the bowl. Cover with a kitchen towel and let rise for in the refrigerator for at least 3 hours, or overnight, until doubled in size.
  6. Once the dough has risen, roll it out to a ¼-inch-thick (6-mm) rectangle about 18×12 inches (20×30 cm).
  7. Make the filling by mixing the melted butter, granulated sugar, and cinnamon together in a small bowl.
  8. Spread the filling evenly over the dough. Roll up the dough and slice into 15 1½-inch (4-cm) thick slices (discard the ends).
  9. Make the caramel sauce: In a small saucepan over medium heat, combine the butter, brown sugar, salt, vanilla, and honey. Keep stirring to prevent the sugar from sticking to the pan. Bring to a gentle boil, then remove the pan from the heat.
  10. Pour the caramel sauce into a 9×12-inch (23×30-cm) baking dish and sprinkle the walnuts on top of sauce. Arrange the rolls in the dish so there are 3 rows of 5 rolls.
  11. Cover with plastic wrap and let the rolls rise for 15 minutes, in a warm place.
  12. Preheat the oven to 350˚F (180˚C).
  13. Remove the plastic wrap and bake the cinnamon rolls for 40 minutes, or until light golden brown.
  14. Let cool for 20 minutes, then invert the rolls onto a serving platter. Leftover cinnamon rolls can be stored up to 5 days in the refrigerator. Reheat in the microwave or oven.

MY FINDINGS:

  1. I used all 4 1/2 cups of flour, the recipe calls to mix 3.5 and then add 1/4 cup as needed while kneading but it is the stickiest dough EVERRR so it took all 4.5 cups.
  2. The yeast

WOULD I MAKE IT AGAIN?

Maybe. The verdict is still out. Everyone BUT me was in love with them. 😂

Have you tried this recipe, too? What did you think about it? Tell in the comments, belowwwwwwww.

ps: It’s yogurt. Banana flavored yogurt taste like spoiled mayonnaise. Woof, just think I barfed a little…my bad!

pss: The original recipe can be found here.

banana bread quotes


COME BE MY FRIEND ON INSTAGRAM. I’M HILARIOUS.
OR
BE MY PENPAL/DEAR DIARY SERIES 👇👇 & SIGN UP VIA THE LINK

https://bit.ly/2wMpE29

Taste Test: Baked Alaska

This Friday’s Taste Test is the Baked Alaska which is considered a unicorn in the dessert world because you don’t see it much anymore. What makes this recipe a challenge is the damn meringue.

Molding the layers of ice cream is the best part! You feel like a sculptor of foods and it’s satisfying to know you’re creating layers of goodness. An easy cheat to making the cake bit is using a white cake box mix. And you best believe I did this cheat 😉

I made this for Christmas at my Father In Law’s house, and I failed miserably. So miserably it’s comical. Never in my life had I ever made meringue and after 15-ish minutes of hand mixing the egg whites I called it good…big mistake.

As you can guess the meringue DRIPPED down the sides as everyone watched. You can’t win them all folks. Scroll to see if it made the cut and the photo proof evidence how terrible it came out.

But first, a quick reminder I’m not a food blogger. There will be no flour-dusted cutting board photos in-between hefty paragraphs filled with adjectives. The word foodie sends an awful noise of nails on a chalkboard down my spine.

I only want to share the recipe and what I learned when baking or cooking it for the first time. The act of making food for others is how I show love, and it’s my fun time. Trying to make something for the first time is always exciting for me because you either nail it or you don’t.

Here we go:

THE RECIPE:

2 quarts vanilla ice cream, softened
1 (18.25 ounce) package white cake mix
1 egg
1/2 teaspoon almond extract
8 egg whites
1/8 teaspoon cream of tartar
1/8 teaspoon salt
1 cup white sugar
  1. Line the bottom and sides of an 8-inch round mixing bowl or deep 8-inch square container with foil. Spread ice cream in container, packing firmly. Cover and freeze 8 hours or until firm.
  2. Preheat oven to 350 degrees F (175 degrees C). Grease and flour an 8×8 inch pan.
  3. Prepare cake mix with egg and almond extract. Pour into prepared pan.
  4. Bake in preheated oven according to package instructions, until the center of cake springs back when lightly touched.
  5. Beat egg whites with cream of tartar, salt, and sugar until stiff peaks form.
  6. Line a baking sheet with parchment or heavy brown paper. Place cake in the center. Turn molded ice cream out onto cake. Quickly and prettily spread meringue over cake and ice cream, all the way to paper to seal. Return to freezer 2 hours.
  7. Preheat oven to 425 degrees F (220 degrees C).
  8. Bake the Alaska on the lowest shelf, 8 to 10 minutes, or until meringue is lightly browned. Serve at once.

MY FINDINGS:

  1. If using a hand mixer, whip the egg whites until you have carpal tunnel…seriously. My recommendation would be to only make meringue if you have a stand mixer because 1) easier on the wrists 2) it’s quieter, hand mixers are LOUD.

WOULD I MAKE IT AGAIN?

Yes, but not until my ego has healed. It was pretty delicious tasting, dripping meringue or not.

Have you tried this recipe, too? What did you think about it? Tell in the comments, belowwwwwwww.

pss: The original recipe can be found here.


baked alaska baking quote julia child

COME BE MY FRIEND ON INSTAGRAM. I’M HILARIOUS.
OR
BE MY PENPAL/DEAR DIARY SERIES 👇👇 & SIGN UP VIA THE LINK

https://bit.ly/2wMpE29

Taste Test: Low Carb No-Bake​ Peanut Butter​ Coconut Cookies

This week’s #TasteTest recipe is a low carb no-bake peanut butter coconut cookie. I’m not on a diet but sometimes I like to try these low carb ‘treats’ just to see if they’re as good as they look. Do you think it’ll make the cut? Scroll to find out!

But first, a quick reminder I’m not a food blogger. There will be no flour-dusted cutting board photos in-between hefty paragraphs filled with adjectives. The word foodie sends an awful noise of nails on a chalkboard down my spine.

I only want to share the recipe and what I learned when baking or cooking it for the first time. The act of making food for others is how I show love, and it’s my fun time. Trying to make something for the first time is always exciting for me because you either nail it or you don’t.

Here we go:

THE RECIPE:

  • ⅔ cup natural peanut butter
  • 2 tablespoons coconut oil
  • 1 teaspoon vanilla extract
  • 1 cup unsweetened shredded coconut flake
  1. Place the peanut butter and coconut oil in a medium microwaveable bowl. Microwave for 30 seconds. Stir to combine. Add the vanilla and stir.
  2. Add the unsweetened shredded coconut flakes and mix until evenly coated.
  3. Dollop the mixture on a parchment-lined baking sheet. Each cookie should be around 1½ inches (4 cm) wide.
  4. Freeze until solid, about 15-20 minutes. Store in the refrigerator in an airtight container or bag.

56.03g total carbs 37.5g dietary fiber 18.53g net carbs/per serving 18.53g/8 cookies = 2.31g net carbs per cookie

MY FINDINGS:

  1. It is goopy and will spread all over the place, don’t make your scoops too heaping because it WILL run all over the place, haha.
  2. My trick would be to accidentally put sweetened coconut flakes in instead of unsweetened. Just say ‘oops’ so it counts as accidental.

WOULD I MAKE IT AGAIN?

Not a chance in Hell. I would make these with Jiffy and sweetened coconut flakes though…

Have you tried this recipe, too? What did you think about it? Tell in the comments, belowwwwwwww.

ps: The original recipe can be found here.

no bake peanut butter coconut cookies

COME BE MY FRIEND ON INSTAGRAM. I’M HILARIOUS.
OR
BE MY PENPAL/DEAR DIARY SERIES 👇👇 & SIGN UP VIA THE LINK

https://bit.ly/2wMpE29

Taste Test: Molten Churro Bombs

This week’s #TasteTest recipe is molten churro bombs which is code for fried drops of heaven filled with chocolate. Apparently, once you click on one recipe by Tasty you will be FLOODED with recipes on your timeline. The name alone would make anyone stop the scroll…

Do you think it’ll make the cut? Scroll to find out!

But first, a quick reminder I’m not a food blogger. There will be no flour-dusted cutting board photos in-between hefty paragraphs filled with adjectives. The word foodie sends an awful noise of nails on a chalkboard down my spine.

I only want to share the recipe and what I learned when baking or cooking it for the first time. The act of making food for others is how I show love, and it’s my fun time. Trying to make something for the first time is always exciting for me because you either nail it or you don’t.

Here we go:

THE RECIPE:

    • 1 cup water
    • 4 tablespoons unsalted butter, 1/2 stick
    • ½ cup sugar, plus 2 tablespoons, divided
    • ½ teaspoon salt
    • 1 cup all-purpose flour
    • 3 large eggs
    • 1 teaspoon vanilla extract
    • 18 milk chocolate truffles
    • oil, for frying
  • CINNAMON SUGAR COATING

    • ½ cup sugar
    • 2 tablespoons cinnamon
  • SPECIAL EQUIPMENT
    • 1 piping bag, with a small closed star tip
  1. In a medium saucepan over medium-high heat, combine the water, butter, 2 tablespoons sugar, and the salt, and bring to a boil.
  2. As soon as the mixture begins to boil, reduce the heat to medium-low and add the flour. Using a wooden spoon, stir until the dough comes together to form a ball, about 1 minute.
  3. Remove the pan from the heat and let cool for 5 minutes before proceeding to avoid accidentally cooking the eggs.
  4. Mix in the eggs, 1 at a time, fully incorporating each egg before adding the next. Then add the vanilla.
  5. Line a baking sheet with parchment paper.
  6. Transfer the dough to a piping bag fitted with a closed star tip.
  7. Pipe 18 1½-inch (3 cm) spiral rounds onto the baking sheet. Top each with a milk chocolate truffle. Pipe the dough in a spiral to cover the truffles, being careful to completely seal the chocolate. Immediately transfer the tray to the freezer and freeze for 1 hour, until solid.
  8. Heat the oil in a deep pot until it reaches 350˚F (180˚C).
  9. Fry in batches of 4 until nicely browned, about 3 minutes, turning so they fry evenly. Drain on a cooling rack, or paper towel-lined plate and dab off any excess oil.
  10. Combine the remaining ½ cup sugar (100 G) and the cinnamon in a small bowl. Roll the warm churro bombs in the mixture to coat.

MY FINDINGS:

  1. No piping bag, per usual. A good ‘ol Ziploc freezer bag with the end cut worked just as well.
  2. When you mix the eggs in one by one it takes a while for them to mix in with the dough, don’t panic, just keep stirring. *in my Dory voice
  3. The recipe mentions 3 minutes at 350, but mine took closer to 4 minutes to get a golden brown look. A good tell was when they began to float, mine would float a little past 3 minutes and then I’d leave them in its oil bath for 30 more seconds.
  4. Also, don’t wait until they’re completely cool to dunk them in cinnamon sugar, the coating won’t stick as well if they don’t have a little hot oil still on them.

WOULD I MAKE IT AGAIN?


The Hubs didn’t feel the same way….here’s his review.

Yes! The melty chocolate makes for a good dipping sauce. Who wouldn’t like to dip fried cinnamon sugar bread into gooey chocolate? Hellooooo. I also feel obligated to say Hubs did not appreciate the chocolate, he’s a purist who believes the original recipe shouldn’t be messed with…but that if the chocolate was solid he might get on board. You can’t see me but my eyes are rolling, again because they rolled when he said it, too. Haha.

Have you tried this recipe, too? What did you think about it? Tell in the comments, belowwwwwwww.

ps: The original recipe can be found here.

Everything you have ever wanted, is sitting on the other side of fear.-16

COME BE MY FRIEND ON INSTAGRAM. I’M HILARIOUS.
OR
BE MY PENPAL/DEAR DIARY SERIES 👇👇 & SIGN UP VIA THE LINK

https://bit.ly/2wMpE29

Cheesy French Onion Chicken

This week’s taste test recipe is a cheesy French onion chicken recipe I found on Tasty. This recipe has minimal steps AND ingredients, it can all be done in one SINGLE  pan. If I could insert an Oprah gif (the one where she’s telling everyone they get a car) I would put it right here because one pan clean ups are my FAVORITE kinds of recipes…but will it make the cut?

In the honor of full disclosure I will tell you I’ve never been a fan of French onion soup…but my Hubs loves French onion so I made it knowing if I hated it he’d probably love it and would devour the leftovers.

But first, a quick reminder I’m not a food blogger. There will be no flour-dusted cutting board photos in-between hefty paragraphs filled with adjectives. The word foodie sends an awful noise of nails on a chalkboard down my spine.

I only want to share the recipe and what I learned when baking or cooking it for the first time. The act of making food for others is how I show love, and it’s my fun time. Trying to make something for the first time is always exciting for me because you either nail it or you don’t.

Here we go:

THE RECIPE:

6 boneless, skinless chicken thighs

salt, to taste

pepper, to taste

1 tablespoon garlic, minced

1 tablespoon dried parsley

1 tablespoon butter

6 large onions, thinly sliced

1 tablespoon fresh thyme

1 cup beef stock

2 cups gruyère cheese, shredded

bread, sliced and toasted, to serve
  1. In a bowl, add the chicken thighs, salt, pepper, garlic, dried parsley, and olive oil, and toss until evenly coated.
  2. Add the chicken to a skillet on medium-high heat. Sear until golden brown, about 4 minutes. Flip and cook the other side of the chicken, 2 minutes. Remove the chicken from the pan and set aside.
  3. Preheat oven to broil.
  4. Add the butter, sliced onions, salt, and pepper to the same pan, stirring occasionally until softened. Reduce heat to low and cook until they are deeply caramelized, about 1 hour.
  5. Add thyme and beef broth and bring the mixture to a simmer.
  6. Add the chicken on top of the onions, and sprinkle with Gruyère cheese.
  7. Broil for 5 minutes, until the cheese is melted and golden brown.
  8. Serve over bread.

MY FINDINGS:

  1. I didn’t have the time frame to reduce the onions down for an hour, it ended up being 30-ish minutes instead which was still flipping awesome.
  2. No parsley or thyme in my cabinet like I thought (wasn’t going back to the grocery store, again) so I found a spice blend floating around the pantry called “Pasta Sprinkle” and used it instead. It contained Mediterranean oregano, California basil, and minced garlic.
  3. If you’re curious about how much cheese I used, it was the e.n.t.i.r.e. block for good measure 🙂 My Hubs says you can never use enough cheese, haha.

WOULD I MAKE IT AGAIN?


HELL TO THE YES, IT WAS BOMB-DIGGITY! It is easy to make and packed full of flavor. It’s going in my rotation for dinners, for sure. Fun Fact: if you ditch the bread it’s Keto and/or low carb.

Have you tried this recipe, too? What did you think about it? Tell in the comments, belowwwwwwww.

ps: The original recipe can be found here.

Everything you have ever wanted, is sitting on the other side of fear.-14

COME BE MY FRIEND ON INSTAGRAM. I’M HILARIOUS.
OR
BE MY PENPAL/DEAR DIARY SERIES 👇👇 & SIGN UP VIA THE LINK

eepurl.com/dienvj

Halibut Poached in Duck Fat

Do you like mild fish? Then this recipe is right up your alley. It is packed with flavor thanks to its duck friend and SUPER simple to make, albeit a little pricy.

But first, a quick reminder I’m not a food blogger. There will be no flour-dusted cutting board photos in-between hefty paragraphs filled with adjectives. The word foodie sends an awful noise of nails on a chalkboard down my spine.

I only want to share the recipe and what I learned when baking or cooking it for the first time. The act of making food for others is how I show love, and it’s my fun time. Trying to make something for the first time is always exciting for me because you either nail it or you don’t.

Today’s Taste Test recipe is from Anthony Bourdain’s Appetites cookbook. Here we go!

THE RECIPE:

1 lemon

1 tablespoon canola or other neutral oil

1 tablespoon fennel seeds

Seeds from 2 cardamom pods

1 bay leaf

4 garlic cloves, peeled and sliced

2 halibut fillets (about 12 ounces each; ask your fishmonger to remove the white belly skin but to leave the dark dorsal skin attached)

Salt and freshly ground black pepper to taste

1 quart rendered duck fat (available at various
gourmet retailers and some butcher shops)

Serve with mashed potatoes

  1. ⁣Using the microplane grater, finely grate the lemon zest into a small mixing bowl and add the oil, fennel and cardamom seeds, bay leaf, and garlic, mixing well. Rub the fish on all sides with the mixture and refrigerate in a casserole or zip-sealed plastic bag for at least 2 hours and up to 24. 
  2. Remove the fish from the refrigerator about 15 minutes before you’re ready to poach it. Brush off the excess garlic and seeds. Season it on all sides with salt and pepper.
  3. In a large, heavy-bottom pot, heat the duck fat over medium heat until it reaches 150°F, monitoring the temperature with the instant-read thermometer. Slip the fish into the pot and ladle the fat over so it is submerged. Let cook for 5 minutes, then remove from the heat, cover, and let sit for 10 to 15 minutes, until the fish has an internal temperature of 150°F. 
  4. Carefully remove the fish from the pot with a slotted
    spoon or fish spatula, adjust seasoning if necessary, and serve with mashed potatoes.
  5. Serves 4

MY FINDINGS:

  1. The temperature of the duck fat is VERY important. Pay attention and monitor it.
  2. It took a little longer for me to poach the fish because the halibut wasn’t submerged completely in the fat, if I were to make it next time I would make sure it’s better covered.
  3. Tons of flavor. The best tasting halibut I’ve ever tasted.

WOULD I MAKE IT AGAIN?

No. I love Bourdain but there are plenty of other fish in the sea I’d rather eat. I’d say making it once to impress and check it off your list. Unless you don’t like strong tasting fish than this might be the next best thing since sliced bread!

If you make them this weekend, share your pictures in the comments or tag me in your post if you share on Instagram @sjrandol.

Anthony Bourdain quote for halibut poached in duck fat

COME BE MY FRIEND ON INSTAGRAM. I’M HILARIOUS.
OR
BE MY PENPAL/DEAR DIARY SERIES 👇👇 & SIGN UP VIA THE LINK

eepurl.com/dienvj

Graham Cracker Rolls

Who loves graham crackers? I do! Who loves bake fails? I do! The last couple of months I’ve been sharing recipes with successful bakes, so I thought it was about time to share a huge fail recipe. My bread never rose, I persevered to see how they’d come out regardless and I made rocks.

My awful rock rolls are pictured below, they’re pretty terrible. It’s laughable. I’m sharing the process anyway.

But first, a quick reminder I’m not a food blogger. There will be no flour-dusted cutting board photos in-between hefty paragraphs filled with adjectives. The word foodie sends an awful noise of nails on a chalkboard down my spine.

I only want to share the recipe and what I learned when baking or cooking it for the first time. The act of making food for others is how I show love, and it’s my fun time. Trying to make something for the first time is always exciting for me because you either nail it or you don’t.

Today’s Taste Test recipe is from Southern Living. Here we go!

THE RECIPE:

  • 1 envelope active dry yeast
  • 1/2 cup warm water (100° to 110°)
  • 1/4 cup plus 2 1/2 tsp. sugar, divided
  • 1 large egg
  • 1/4 cup vegetable shortening
  • 1 teaspoon table salt
  • 1/2 cup boiling water
  • 2 1/2 cups all-purpose flour
  • 3/4 cup graham cracker crumbs, divided
  • Parchment paper
  • 3 tablespoons butter, melted
  1. Combine first 2 ingredients and 1 tsp. sugar; let stand 5 minutes.
  2. Beat egg, shortening, salt, and 1/4 cup sugar at medium speed with a heavy-duty electric stand mixer until creamy. Add boiling water; stir until shortening melts. Stir in yeast mixture. Stir flour and 1/2 cup crumbs into egg mixture.
  3. Place dough in a lightly greased (with shortening) bowl; cover, and chill 8 to 24 hours.
  4. Punch dough down. Turn dough out onto a lightly floured surface, and knead 4 or 5 times. Roll to 1/2-inch thickness. Cut dough into rounds with a 1 1/2- to 2-inch round cutter, rerolling scraps twice. Place rolls 1 inch apart on a parchment paper-lined baking sheet, and brush with melted butter.
  5. Stir together remaining 1/4 cup cracker crumbs and 1 1/2 tsp. sugar. Sprinkle mixture over rolls. Cover and let rise in a warm place (80° to 85°), free from drafts, 45 minutes to 1 hour or until doubled in bulk.
  6. Preheat oven to 350°. Bake, uncovered, 15 to 18 minutes or until golden.

MY FINDINGS:

  1. It’s really important to care about the temperature of the water to dissolve the yeast.
  2. Do not over knead the dough and cover it properly (tight) so the air doesn’t get to it. I think too much air got to my dough and it wasn’t able to rise. I had the wannabe plastic wrap that didn’t stick to the bowl and hardly covered the top of the bowl.
  3. After the chilling process if your dough hasn’t risen, don’t bother continuing steps four through six, unless you want to be twins…

WOULD I MAKE IT AGAIN?

Yes. I didn’t get to taste them because who wants to eat rocks? And I love graham cracker anything.

If you make them this weekend, share your pictures in the comments or tag me in your post if you share on Instagram @sjrandol.

graham cracker roll taste test recipe

COME BE MY FRIEND ON INSTAGRAM. I’M HILARIOUS.
OR
BE MY PENPAL/DEAR DIARY SERIES 👇👇 & SIGN UP VIA THE LINK

eepurl.com/dienvj

Italian Pignoli Cookies

I read cookies are the crown jewels of Italian confections. Is this actually the truth for Italians? Don’t ask me, I’ve never been. But it’s Friday, so that means it’s time for a Taste Test recipe to try this weekend.

But first, a quick reminder I’m not a food blogger. There will be no flour-dusted cutting board photos in-between hefty paragraphs filled with adjectives. The word foodie sends an awful noise of nails on a chalkboard down my spine.

I only want to share the recipe and what I learned when baking or cooking it for the first time. The act of making food for others is how I show love, and it’s my fun time. Trying to make something for the first time is always exciting for me because you either nail it or you don’t.

Today’s Taste Test recipe is from Taste of Home. Here we go!

THE RECIPE:

  • 1-1/4 cups (12 ounces) almond paste
  • 1/2 cup sugar
  • 4 large egg whites, divided
  • 1 cup confectioners’ sugar
  • 1-1/2 cups pine nuts
  1. In a small bowl, beat almond paste and sugar until crumbly. Beat in 2 egg whites. Gradually add confectioners’ sugar; mix well.
  2. Whisk remaining egg whites in a shallow bowl. Place pine nuts in another shallow bowl. Shape dough into 1-in. balls. Roll in egg whites and coat with pine nuts. Place 2 in. apart on parchment-lined baking sheets. Flatten slightly.
  3. Bake at 325° until lightly browned, 15-18 minutes. Cool for 1 minute before removing from pans to wire racks. Store in an airtight container.

MY FINDINGS:

  1. These are fancy cookies, and by fancy I mean pricey. Pine nuts aren’t cheap, fair warning.
  2. If you’re not a fan of almond paste, you won’t be a fan of these cookies. The almond flavor is strong in this one.
  3. Pay attention to step one, somehow I messed it up and had to go back out and get more almond paste.

WOULD I MAKE IT AGAIN?

No. I am not a fan of the almond flavor. But they’re pretty!

If you make them this weekend, share your pictures in the comments or tag me in your post if you share on Instagram @sjrandol.

Italian Pignoli cookie quote for #tastetest Fridays

COME BE MY FRIEND ON INSTAGRAM. I’M HILARIOUS.
OR
BE MY PENPAL/DEAR DIARY SERIES 👇👇 & SIGN UP VIA THE LINK

http://eepurl.com/dienvj

The Best Cafe Du Monde Beignet Copycat Recipe

When I say I found the best Cafe Du Monde Beignet copycat recipe, I am not just saying it to get clicks. I have been looking for good beignets ever since I went to Mardi Gras back in 2015 with a girlfriend.

I used to get really excited when I’d see a restaurant with beignets on its dessert menu, but after a number of flat donut disappointments, I became extremely jaded. “Yeah, let’s see what their definition of a beignet is…”

Nothing will ever compare to the experience I had in New Orleans, but the days of dismay are OVER. I’m going to ruin the ending and tell you, these are flipping worth it!

But first, let’s recap in case you don’t know my rules…

I’m not a food blogger. I share recipes I’ve tried and if I’d make them again. I hate the word foodie and hefty paragraphs filled with adjectives about the recipe, and photographs that have dusted flour and cutting boards.

You can expect the recipe I used, helpful tricks or what not to do and a couple (probably one) real shots of what it looked like when my bake came out of the oven.

THE RECIPE:

  • 3/4 cup warm water (105 to 110 degrees F)
  • 1 1/4 teaspoons active dry yeast
  • 1/3 cup granulated sugar
  • 1/2 cup whole milk
  • 1 egg, beaten
  • 3/4 teaspoon salt
  • 18 ounces (3 1/2 cups) all-purpose flour
  • 2 tablespoons vegetable shortening, melted
  • Cottonseed oil for frying
Dust with
  • Powdered sugar


  1. Dissolve the yeast and sugar in the warm water in a large mixing bowl, or the bowl of a stand mixer. Let the solution sit for 15 minutes and it will become foamy.
  2. Whisk in the milk, egg, and salt. Then mix in half of the flour with a large spoon. If using a mixer, use a paddle attachment on low to medium speed.
  3. Mix in the shortening.
  4. Add the remaining flour and mix with the spoon until you can use your hands, then turn the dough out onto a floured board and knead just until smooth. Don’t over-knead or the dough will get too tough. If using a mixer, swap out the paddle for your dough hook and knead just until the dough is smooth.
  5. Place the dough in an oiled bowl covered with plastic wrap or a towel in a warm spot to rise for 2 hours. The dough will double in size.
  6. Preheat 3 to 4 inches of cottonseed oil in a pan or deep fryer to 370 degrees F.
  7. On a heavily floured surface, roll out the dough until it is 1/4-inch thick. Use a pizza slicer or knife to cut the dough into 2 1/2-inch square pieces and fry 3 to 4 pieces at a time in the oil. Immediately after dropping the dough into the oil use a large spoon to gently splash hot oil over the top of each piece. after 30 to 45 seconds, flip all of the beignets over and continue to baste with the oil. After another minute or so, flip the beignets again, and continue to cook until the beignets are a deep golden brown. Continue flipping the beignets over to brown them evenly on both sides. After about 3 minutes, they should be done. Let them drain on a cooling rack or a paper towel-lined plate for a minute until you can handle them.
  8. Serve three beignets on a plate with a very heavy dusting of powdered sugar on top.

MY FINDINGS:

  1. It’s important to care about the temp of your warm water. I microwaved warm water from the tap for 15-seconds, and it was almost spot on.
  2. I couldn’t find Cottonseed oil, so I used Peanut oil because Google told me it was the closest to cottonseed…
  3. The next time I make these I’m doubling the size in the name of authenticity.

WOULD I MAKE IT AGAIN?

Hell yes. I served with a raspberry sauce because SCREW THOSE WHO SERVE IT WITH COFFEE FLAVORED WHIPPED CREAM! I put one container of raspberries, half a lemon’s juice and 1/4 cup of sugar in a medium saucepan and boiled it down on low heat for 15(ish) minutes. I then put it through a sieve to rid the seeds and this little extra step is WORTH IT.

Have you ever had a beignet at Cafe Du Monde?

New Orleans quote

Huge shoutout to The Food Hacker for this pot of gold. You can find it, here.
COME BE MY FRIEND ON INSTAGRAM. I’M HILARIOUS.
OR
BE MY PENPAL/DEAR DIARY SERIES 👇👇 & SIGN UP VIA THE LINK

http://eepurl.com/dienvj