Poppy’s Creme Brûlée

Did you read today’s Taste Test recipe and tense up a little bit? I wonder why it’s made out to be such a difficult dessert to try, maybe it’s the fancy top hat above the ‘u’ that makes it seem way to fancy to try? Let me tell you, I’d rather make Creme Brûlée any day over that damn bread that gave me bruises!

I got this recipe from my Dad (aka Poppy). He made it on Paint maybe a decade ago and emailed it to me. I kid you not, he made it for me on Paint and it is carefully preserved in my cooking binder between two plastic sheets.

But first, let’s recap in case you don’t know my rules…

I’m not a food blogger. I share recipes I’ve tried and if I’d make them again. I hate the word foodie and hefty paragraphs filled with adjectives about the recipe, and photographs that have dusted flour and cutting boards.

You can expect the recipe I used, helpful tricks or what not to do and a couple (probably one) real shots of what it looked like when my bake came out of the oven.

The Recipe:

4 Tablespoons granulated sugar

2 1/2 cups heavy cream

6 egg yolks

1/2 teaspoon vanilla extract

What you need:

Mixing bowl, wire whip, ramekins, pyrex oven pan, heavy bottom saucepan, thermometer, torch spark, and wire sift.

  1. Gather supplies/ingredients. Get some water boiling and heat oven to 350 degrees.
  2. Heat 2 1/2 cups heavy cream in a heavy bottom saucepan until it reaches 175 – 180 degrees and remove from heat.
  3. Meanwhile place 6 egg yolks, 4 Tablespoons sugar, and 1/2 teaspoon vanilla in mixing bowl and whisk until frothy.
  4. Remove 1/4 cup of the hot heavy cream and slowly pour into egg mix while whipping vigorously to temper egg mix. Repeat with another 1/4 cup.
  5. Slowly pour entire tempered egg mix into heavy cream while whipping with might. Scrape bowl well with rubber spatula.
  6. The mixture will be frothy on top. Use a skimmer to remove the froth. Be sure to let liquids pass through simmer back into mix before dumping froth. Repeat until very little froth is left.
  7. Place 4 ramekins into your baking pan and fill pan with water until the water reaches halfway up ramekins. Pour approximately 2/3 cup of mix into each ramekin.
  8. Bake in over for 20 – 25 minutes. When sides are firm but the center is slightly jiggly the custard is done. Remove from oven and leave in water pan for 10 minutes. Place in fridge and chill for about 4 hours.

To Serve:

  • Sprinkle 2 teaspoon of sugar over top of the Brulee and lightly shake the ramekin back and forth to get an even coat.
  • Brown sugar with a torch. The tip of the flame that is yellow is the hottest part. Sugar should meet flame at top of the yellow tip. Use a right to left back and forth motion starting at the top and work your way down as sugar carmelizes.
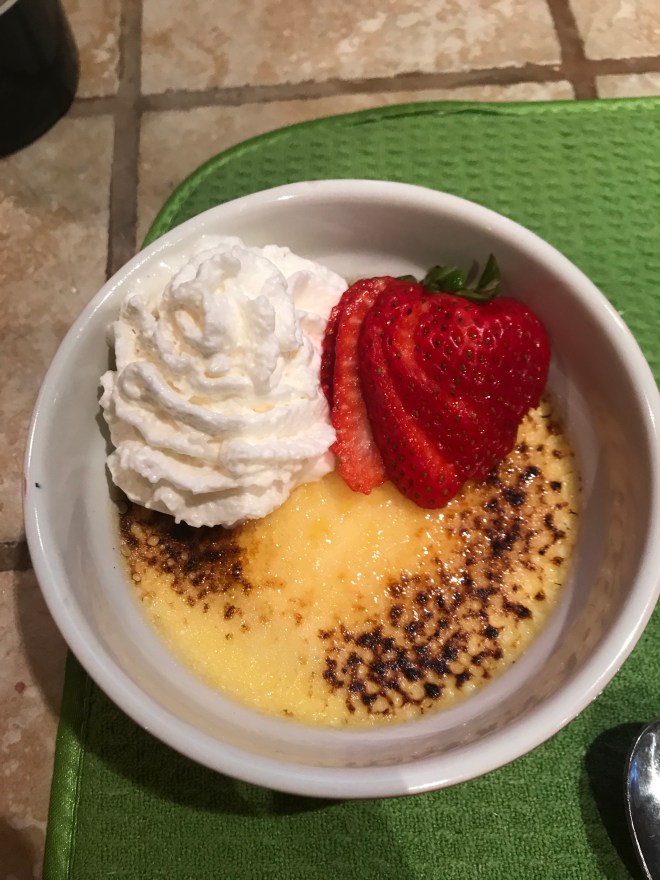
  • Note: I like to serve it with a whipped cream rose and strawberry fan on the side or on a plate with a spoon. You can also serve whipped cream on top of Brulee wit
  • h a sprinkle of raspberries, too.

My Findings:

  1. Do not dump all of the hot heavy cream into the egg mixture, it will curdle the eggs. You need to have patience and not rush the tempering.
  2. If you don’t have a small wire sift to skim the top, use a spoon and carefully de-froth the top.
  3. The boiling water is for the water surrounding the ramekins before it enters the oven. I think the boiling water help keep it at an even temp. in the oven and it takes longer to bake if you don’t use heated water, don’t quote me but that sounds right.

Would I Make It Again?

Hell yes. It’s easier than it looks (and sounds). I remember being so nervous I was going to fuck up the tempering I was SUPER and ridiculously slow at it. I never thought the mixtures would ever be melded as one…so find a happy medium, you don’t have to be a psycho like I was the first go around and you can’t dump half or all of it in one or two shots.

Have you ever tried to make Creme Brûlée? How’d it turn out? Tell me in the comments.

Creme Brûlée quotes or sayings

Come be my friend on Instagram. I’m hilarious.
This is my Dad’s recipe that he wrote up on Paint for me some 10 years ago. I have no idea where it came from or if it has his own tweaks.


Taste Testing Mary Berry’s Victoria Sandwich​

Has anyone tried making any of the recipes I’ve shared, yet? Share it in the comment section below so I can see what everyone else is up to on the other side of this screen 😉

Today’s taste test involves another great recipe found by watching The Great British Baking Show (thanks Netflix! I was late to the GBBO craze) and it’s Mary Berry’s Victoria Sandwich recipe.

Luckily, converting this one was MUCH easier than the Povitica recipe I shared a few weeks ago due to the fact she has the ounces next to the grams and my measuring cup has the ounces listed, haha. The odds are more in your favor here.

But first, let’s recap in case you don’t know my rules…

I’m not a food blogger. I share recipes I’ve tried and if I’d make them again. The word foodie and hefty paragraphs filled with adjectives about the recipe annoy me. Oh, and photographs that have dusted flour and cutting boards.

You can expect the recipe I used, helpful tricks or what not to do and a couple (probably one) real shots of what it looked like when my bake came out of the oven.

The Recipe:

For the sponge

4 large free-range eggs

225g (8oz) caster sugar, plus extra for sprinkling

225g (8oz) self-raising flour

1 level tsp baking powder

225g (8oz) unsalted butter, softened, plus extra for greasing

For the jam

200g (7oz) raspberries

250g (9oz) jam sugar

For the buttercream

100g/3½oz unsalted butter, softened

200g/7oz icing sugar sifted

2 tbsp milk

Directions

  1. Preheat the oven to 350F. Grease and line two 8in sandwich tins: use a piece of baking or silicone paper to rub a little baking spread or butter around the inside of the tins until the sides and base are lightly coated. Line the bottom of the tins with a circle of baking paper.
  2. Break the eggs into a large mixing bowl, add the sugar, flour, baking powder and soft butter. Mix everything together until well combined. Be careful not to over-mix – as soon as everything is blended you should stop. The finished mixture should be of a soft ‘dropping’ consistency.
  3. Divide the mixture evenly between the tins. Use a spatula to remove all of the mixture from the bowl and gently smooth the surface of the cakes.
  4. Place the tins on the middle shelf of the oven and bake for 25 minutes. Don’t be tempted to open the door while they’re cooking, but after 20 minutes do look through the door to check them.
  5. While the cakes are cooking, make the jam. Put the raspberries in a small deep-sided saucepan and crush them with a masher. Add the sugar and bring to the boil over a low heat until the sugar has melted. Increase the heat and boil for 4 minutes. Remove from the heat and carefully pour into a shallow container. Leave to cool and set.
  6. The cakes are done when they’re golden-brown and coming away from the edge of the tins. Press them gently to check – they should be springy to the touch. Remove them from the oven and set aside to cool in the tins for 5 minutes. Then run a palette or rounded butter knife around the inside edge of the tin and carefully turn the cakes out onto a cooling rack.
  7. To take your cakes out of the tins without leaving a wire rack mark on the top, put the clean tea towel over the tin, put your hand onto the tea towel and turn the tin upside-down. The cake should come out onto your hand and the tea towel – then you can turn it from your hand onto the wire rack. Set aside to cool completely.
  8. For the buttercream, beat the butter in a large bowl until soft. Add half of the icing sugar and beat until smooth. Add the remaining icing sugar and one tablespoon of the milk and beat the mixture until creamy and smooth. Add the remaining tablespoon of milk if the buttercream is too thick. Spoon the buttercream into a piping bag fitted with a plain nozzle.
  9. To assemble, choose the sponge with the best top, then put the other cake top-down on to a serving plate. Spread with the jam then pipe the buttercream on top of the jam. Place the other sponge on top (top uppermost) and sprinkle with caster sugar to serve.

My Findings:

  • I had never made jam before and was super worried about it ‘setting’ so I picked up some pectin just in case and added a sprinkling of it to my mixture. I also added the sugar scoop by scoop because I wanted to control the sweetness. I ended up using a little over a half cup of sugar.
  • My piping bag was a Ziploc baggy with the corner cut off. Now, this works in a pinch but it did not give me the freedom to make those beautiful pillow clouds of buttercream you see pictured on Mary Berry’s bake.
  • Nothing with homemade buttercream is going to be awful.

Would I Make It Again?

YES. It was super simple and flipping DELICIOUS. The proper storage will keep the sponge fresh for days! I use an oversized container with a locking lid as a makeshift cake holder/saver.

eating cake quote

Come be my friend on Instagram. I’m hilarious.
Originally recipe found, here.

Tuscan Kale Soup

Usually, I’m not down for attending cooking classes at kitchen supply stores or ‘we do team building events!’ type places. The work is done for you and at some places, you can’t take the leftovers home, so if you took a 3PM class and weren’t quite hungry, you can’t take your’s home for later. Speaking from experience, bitterly.

Then I went to The Wine Artist with my MIL and they let you drink wine while making your dinner and I’m 100% certain that made the whole cooking in a group thing, more enjoyable. The menu that night was also bomb, the theme was Under The Tuscan Sun.

So, today’s Taste Test recipe you most definitely want to try this weekend is the Tuscan kale soup.

But first, let’s recap in case you don’t know my rules…

I’m not a food blogger. I share recipes I’ve tried and if I’d make them again. The word foodie and hefty paragraphs filled with adjectives about the recipe annoy me. Oh, and photographs that have dusted flour and cutting boards.

You can expect the recipe I used, helpful tricks or what not to do and a couple (probably one) real shots of what it looked like when my bake came out of the oven.

The Recipe:

1 Tablespoon olive oil

1-pound spicy Italian ground sausage

1 onion diced

2 carrots, peeled and diced

4 garlic cloves minced

1 (14.5 oz) can white cannellini beans

4 cups chicken broth

2 cups water

1 teaspoon salt

1 teaspoon pepper

1 teaspoon Italian seasoning

1/4 teaspoon red pepper flakes

1 bunch of kale, roughly chopped with stems removed

Toppings: parmesan cheese

  1. Heat oil in a large pot. Add sausage and cook until no longer pink. Add in onions and carrots and saute for a few minutes until onions are soft. Add garlic and continue to cook for a few minutes.
  2. Add in beans, chicken broth, water, salt, pepper, Italian seasoning, and red pepper flakes and stir together. Cover and bring to a boil. reduce heat and simmer for 10 minutes.
  3. Add in kale and continue to simmer for 10 minutes or until kale and vegetables are tender. Taste and adjust seasoning, as needed.

My Findings:

  • The easiest and most impressive soup you’ll ever make.
  • I ate this for lunch every day for a week, there is such thing as too much kale for the system…but I’d probably make a big batch and do it all over again #noragrets bwahaha.
  • During the class, we also pan-fried baguette slices for dunking purposes…best idea ever

Would I Make It Again?

I think you know my answer. If it rains, I’m making this soup. If I want soup, I’m making this one, and if I need to bring something somewhere and wait until last minute, I’m bringing this damn soup. SO SO good.

under the tuscan sun quote about cooking

Come be my friend on Instagram. I’m hilarious.
Originally recipe from The Wine Artist in Lake Forest, CA.

Povitica – A Croatian Sweet(ish) Bread

Have you ever made Povitica? If you’ve watched a few episodes of The Great British Baking Show you may have seen it during one of the technical challenges. It’s a “sweet’ (not if your American) dessert bread filled with a boozy, walnut, and cocoa filling.

During a Christmas gingerbread making house party, my MIL’s friend was talking about a recipe her Mom used to make when she was a kid but couldn’t remember the name, so I asked her to tell me how it tasted and the main ingredients she remembered.

It sounded a lot like the Croatian bread, Povitica. Her mother had been long gone and missed the Christmas memory, so I decided to see if this recipe was THE one with a small hope it would give her a little taste of home.

Fair warning, this isn’t for the faint of heart. It’s a pain in the ass to make, strictly based off what goes in to stretching the bread, but if you like a challenge…do it.

But first, let’s recap in case you don’t know my rules…

I’m not a food blogger. I share recipes I’ve tried and if I’d make them again. The word foodie and hefty paragraphs filled with adjectives about the recipe annoy me. Oh, and photographs that have dusted flour and cutting boards.

You can expect the recipe I used, helpful tricks or what not to do and a couple (probably one) real shots of what it looked like when my bake came out of the oven.

The Recipe:

For the dough:

300g (10½ oz) plain flour, plus extra for dusting

40g (1½ oz) caster sugar

7g salt

10g (⅓ oz) fast-action yeast

30g (1oz) unsalted butter, melted

1 large free-range egg, beaten

½ vanilla pod, split and seeds scraped out

150ml (5½ fl oz) whole milk, warmed

For the filling:

60g (2¼ oz) unsalted butter

4 tbsp whole milk

280g (10 oz) walnut pieces

½ vanilla pod, split and seeds scraped out

100g (3½ oz) caster sugar

2 tbsp cocoa powder

1 free-range egg yolk, beaten

To assemble:

15g (½ oz) butter, melted

1 free-range egg white, beaten

100g (3½ oz) icing sugar

Directions

  1. For the dough, tip the flour and sugar into the bowl of a freestanding mixer fitted with a dough hook. Add the salt into one side of the bowl and the yeast to the other. Add the melted butter, egg, vanilla seeds and warm milk and begin mixing on a slow speed. When the dough starts to come together, mix for a further 5-8 minutes on a medium speed until the dough is soft, smooth and stretchy.
  2. Tip the dough into a lightly oiled mixing bowl, cover with cling film and leave to rise until at least doubled in size – about one hour. Butter a 1kg (2lb) loaf tin.
  3. For the filling, place the butter and milk in a small pan and heat gently until the butter has melted. Remove from the heat.
  4. Place the walnuts, vanilla seeds, sugar and cocoa powder into the bowl of a food processor and blend to a sandy powder. Add the egg yolk, milk and butter mixture and pulse to combine. Set aside.
  5. To assemble, spread a clean bed sheet over a kitchen table and dust with flour. Turn the risen dough out onto the sheet and roll out the dough into a large 50x30cm (20x12in) rectangle. Brush the surface with 15g (½oz) melted butter.
  6. Dust your hands with flour and ease them underneath the dough. Using the backs of your hands, stretch the dough out from the centre until very thin and translucent (you should be able to see the sheet through the dough). The rectangle should measure approximately 1metrex60cm (40x24in).
  7. Taking care not to tear the dough, spread the filling over the dough until evenly covered. If the filling has been standing for a long time and is too thick, add a little warm milk to loosen it.
  8. Starting at the long edge of the dough, lift the sheet and gently roll the dough up tightly, like a Swiss roll.
  9. Carefully lift the dough and place one end in the bottom corner of the greased loaf tin. Ease the roll into the base of the tin to form a long ‘U’ shape, then double back laying the roll over the first ‘U’ shape to form a second ‘U’ shape on top.
  10. Place the loaf tin inside a clean plastic bag and leave to rise for one hour.
  11. Preheat the oven to 180C/160C(fan)/ 350F/Gas 4.
  12. Brush the dough with beaten egg white and bake for 15 minutes. Reduce the oven temperature to 150C/130C(fan)/300F/Gas 3 and bake for a further 45 minutes, or until golden-brown. Cover with foil if the top begins to darken too much.
  13. Remove from the oven and leave to cool in the tin for 30 minutes before turning out onto a wire rack to cool completely.
  14. Mix the icing sugar with a few drops of cold water to make a runny icing and drizzle it over the povitica. Slice and enjoy.

My Findings:

  1. May the odds be ever in your favor when converting from metric to standard. I would give you my exact measurements but the piece of paper I flipping wrote it on disappeared (I’m looking at you, Hubs!).
  2. ps: Just get a scale to weigh it out on, I had to remake the dough THREE times. Save yourself the hassle (and two or maybe three – dear Zeus – hours) and spend the $10.
  3. I used the rolling pin as long as I possibly could before I started to stretch with my palms and fingers, not back of the hands as suggested because I’m pretty sure I would still be there trying to stretch it.
  4. I think adding some cinnamon in the filling and cutting the cocoa in half might be good. Oh! And some chopped walnuts sprinkled throughout, too.
  5. Needs to be eaten with coffee or tea. It was lighter tasting than I expected which I assume is due to all the layers, but I wouldn’t consider it sweet like a Cinnabon roll. So if you’re worried it is a true (American) dessert bread, it’s not.

Would I Make It Again?

Fuck no. I’d rather make a cinnamon roll, but I would absolutely make it again if my MIL’s friend specifically asked for it next Christmas.

I made four other people taste a slice before giving it away and got no complaints, but all agreed it wasn’t as sweet as they were expecting considering it was iced.


Povitica Quote on Taste Testing Friday post on RamblinRandol

Come be my friend on Instagram. I’m hilarious.
Originally recipe found, here.

Julia Child’s Poulets Grilles A La Diable

It’s Friday again, so that means we have a new recipe to try for the weekend! Two weeks ago I shared a tuna recipe from Child, this week I’m sharing a broiled chicken recipe I made for me and the in-laws.

But first, let’s recap in case you don’t know my rules…

I’m not a food blogger. I share recipes I’ve tried and if I’d make them again. I hate the word foodie and hefty paragraphs filled with adjectives about the recipe, and photographs that have dusted flour and cutting boards.

You can expect the recipe I used, helpful tricks or what not to do and a couple (probably one) real shots of what it looked like when my bake came out of the oven.

The Recipe:

2 ready-to-cook, 2 1/2 lb. broilers (chicken), halved or quartered.
A saucepan containing 6Tb melted butter and 2 Tb oil.
A pastry brush
Broiling pan minus the rack
salt
6Tb prepared mustard if the strong Dijon type
3 Tb finely minced shallots or green onions
1/2 tsp thyme, basil or tarragon
1/8tsp pepper
pinch of cayenne pepper

4 cups fresh, white crumbs from the home-made type of bread (make the crumbs in an electric blender, 3 or 4 slices of bread at a time)

Broiling pan with a rack, the rest of the basting fat

  1. Preheat oven broiler to moderately hot.
  2. Dry the chicken thoroughly, paint it with butter and oil, and arrange it skin-side down in the bottom of the broiling pan. Place it so that the surface of the chicken is 5 to 6 inches from the hot broiling element and broil 10 minutes on each side, basting every 5 minutes. The chicken should be very lightly browned. Salt it lightly.
  3. Blend the mustard with the shallots or onions, herbs, and seasonings in a bowl. Drop by drop, beat in half the basting fat to make a mayonnaise-like cream. Reserve the rest of the basting fat for later. Paint the chicken pieces with the mustard mixture.
  4. Pour the crumbs into a big plate, then roll the chicken in the crumbs, patting them on so they will adhere.
  5. Arrange the chicken pieces skin-side down on the rack in the broiling pan and dribble half the remaining basting fat over them. Brown slowly for 10 minutes under mod. hot broiler. Turn, baste with the last of the fat, and brown 10 minutes more on the other side. The chicken is done when the thickest part of the drumstick is tender, and, when the meat is pricked with a fork, the juices run clear yellow.

Transfer to a hot platter and serve.

My Findings:

  • Reserve ALL the basting fat. I had to be skimpy because I got frustrated trying to bast up the juices, so get it all out.
  • I got my chicken from WholeFoods already cut into halves which makes it SO much easier.
  • This was a ‘simpler’ recipe than the tuna, so if that’s something important to you start here.

Ps: I made this with roasted potatoes and asparagus rolled in oil, parmesan and garlic salt. Don’t think you can leave the asparagus in the oven to save counter space (and keep warmer for longer) while preparing the chicken. Apparently, the oven still heats whatever is in it when the broiler is on and WILL burn your wonderfully prepared asparagus.

Julia suggests another chilled rose, but I went for the vodka sodas with lime instead.

Would I Make It Again?

Julia child recipe for broiled chicken with mustard

… no, I wouldn’t. It was good don’t get me wrong! But it didn’t get me as excited as the fish recipe. I would make it again if requested, and possibly quarter the chicken to get it EXTRA crispy because I love crisp (but not like the asparagus crisp…).

Julia Child quote for recipe

Come be my friend on Instagram. I’m hilarious.

Pioneer Woman’s Cinnamon Raisin Bread

It’s Friday, and that means I’m sharing another recipe I’ve tried and whether or not it’s worth the effort. This week I’m tasting testing the Pioneer Woman’s cinnamon raisin bread recipe. Have you ever heard of said Pioneer Woman?

I had not until announcing I had a zillion raisins left over from the homemade mincemeat I made over the holidays and wasn’t sure what to do with them. A coworker shouted out to make this recipe because “it’s. the. bomb.”

But let’s recap in case you’re new.

I’m not a food blogger. I share recipes I’ve tried and if I’d make them again. I hate the word foodie and hefty paragraphs filled with adjectives about the recipe, and photographs that have dusted flour and cutting boards.

You can expect the recipe I used, helpful tricks or what not to do and a couple (probably one) real shots of what it looked like when my bake came out of the oven.

The Recipe:

FOR THE DOUGH:
  • 1 cup Milk, Almond Milk, Or Soy Milk, At 110ºF
  • 2 Tablespoons Brown Sugar (See Note)
  • 2-1/4 teaspoons Instant Rise Yeast
  • 6 Tablespoons Neutral Oil (See Note) Or Melted Unsalted Butter
  • 2 Eggs
  • 3-1/2 cups All-purpose Flour (17 1/2 Ounces By Weight), Plus More For Dusting
  • 1 teaspoon Salt
  • 1/2 cup Raisins
FOR THE CINNAMON FILLING:
  • 1/3 cup Brown Sugar
  • 2 Tablespoons Ground Cinnamon
  • 3 Tablespoons Melted Butter (or Oil)

Combine milk, brown sugar, and yeast in a bowl or measuring cup. Let sit for 10 minutes, until foamy. This indicates that the yeast is alive and well.

Pour the yeast liquid into the bowl of a stand mixer, and add oil and eggs. Whisk to combine the wet ingredients, then add flour and salt. Use the dough hook or a spatula to roughly combine the wet and dry ingredients into a shaggy dough. Add the raisins, then fit the bowl and dough hook to the stand mixer. Knead on medium-low speed for 10 minutes.

Remove the dough hook, cover the bowl with plastic wrap, and let the dough rise for 1 hour until doubled in size.

Flour your countertop as lightly as possible, then spread and stretch the dough into a rectangle that is the length of your loaf pan, about 9 inches by 18 inches. I prefer to use a 9×5 loaf pan.

Make the cinnamon filling by stirring together brown sugar, cinnamon, and butter. Spread this mixture all over the top of the dough rectangle, then roll the dough up as tightly as you can, rolling the long way. Place the roll seam-side down into a greased loaf pan, then cover with plastic wrap to let rise for 30 minutes.

Preheat oven to 375ºF, then bake bread for 40–50 minutes until the inside reads 190ºF to 200ºF with a thermometer. Let the bread cool completely on a wire rack before slicing. Enjoy!

Notes:
1. The 2 tablespoons brown sugar won’t make the bread very sweet. If you want a sweeter loaf, double the brown sugar.
2. I use grapeseed oil, but you could also use canola oil, vegetable oil, a light olive oil, etc.
3. The dough will be sticky but resist the urge to add more flour, as it will make the bread denser.

Storage: Since there are no preservatives, the bread will only keep for a few days at room temperature. I recommend freezing any unused bread.

My Findings:

  1. I tested with regular milk and almond milk, I enjoyed the almond milk recipe better.
  2. Regular milk heats up faster than almond milk. It took 30-45 seconds to heat regular milk in the microwave. It took almost 1.5 minutes to heat the almond milk to temp. I did both in 30-second intervals.
  3. I found the dough to be stickier with almond milk but held its shape better.

Would I Make It Again?

Yes. I hate raisins and LOVED this bread. I think I may need to bake it for holiday gifts this Christmas!

Everything you have ever wanted, is sitting on the other side of fear. (5).png

COME BE MY FRIEND ON INSTAGRAM. I’M HILARIOUS.

Julia Child’s Thon A La Provencale

Another Friday, another opportunity to cook something new this weekend. I got Julia Child’s Mastering The Art of French Cooking for Christmas and this weekend’s recipe to try is Thon A La Provencale which is tuna or swordfish with wine, tomatoes, and herbs.

But let’s recap in case you’re new.

I’m not a food blogger. I share recipes I’ve tried and if I’d make them again. I hate the word foodie and hefty paragraphs filled with adjectives about the recipe, and photographs that have dusted flour and cutting boards.

You can expect the recipe I used, helpful tricks or what not to do and a couple (probably one) real shots of what it looked like when my bake came out of the oven.

The Recipe:

3Lbs. fresh tuna or swordfish cut into 3/4 inch steaks
9×14 pyrex baking dish about 2.5 inches deep
1 tsp salt
2 Tb lemon juice
6Tb olive oil, more if needed
A skillet
1 cup minced yellow onions
3Lbs. fresh, ripe and red tomatoes, peeled, seeded, juiced and chopped.
2 cloves mashed garlic
1/2tsp oregano
1/4tsp thyme
1/4 tsp salt
1/8 tsp pepper
1 cup dry white wine or 2/3 cup dry white vermouth
1 to 2 Tb tomato paste for added flavor and color
1Tb meat glaze (optional)
1Tb softened butter
2 to 3 Tb chopped parsley

  1. Remove skin of the dish and cut steak into serving pieces. Blend salt and lemon juice in baking dish, then beat in the oil and pepper. Arrange the fish in the dish and baste with marinade. Cover with wax paper and marinate for 1.5 – 2 hours, turning and basting the fish with marinade several times. Drain the fish and dry it thoroughly on paper towels. Discard marinade.
  2. Saute the fish rapidly in very hot olive oil for a minute or two on each side to brown lightly. Rearrange the fish in the baking dish.
  3. Preheat oven to 350 degrees.
  4. Cook the onions slowly in the skillet for 5 minutes or until tender but not browned. Stir in the tomato pulp, garlic, seasonings, and spread the tomato mixture over the fish.
  5. Place a cover or aluminum foil over the baking dish and bring to a simmer on top of the stove. Then set in lower third of preheated oven and bake for 15 minutes. Pour in the wine and bake for 30 minutes more, turning oven down to 325 as soon as fish is simmering.
  6. Remove fish to serving platter, scraping the sauce off the fish and back into the baking dish. Keep fish warm for about 5 minutes while finishing the sauce.
  7. Boil down the sauce over high heat until it has reduced to about 2 cups. Stir in tomato paste and optional meat glaze. Simmer for a moment, and correct seasoning.
  8. Off heat, beat in the flour and butter paste, bring again to the summer for 1 minute. Stir in the chopped parsley, spoon the sauce over the fish, and serve.

My Findings:

  1. I should’ve used my cast iron skillet instead of a pyrex pan because you can’t cook glass on the stovetop. I Googled it.
  2. You must be VERY careful to not overcook the fish, tuna is SO easy to overcook.
  3. Pop your serving plater in the oven with the fish to keep warm and warm up while making the sauce.
  4. Julia suggests a chilled Rose wine or a dry white, or Riesling. We tried it with rose and I just can’t do pink wine. I’d suggest a dry white instead.

Ps: I used tuna from WholeFoods and did not opt to add in meat glaze (mostly because I hadn’t any prepared and I underestimated how much time it was going to take to cook the tuna and it was 8PM by the time we ate, both the Hubs and I were HANGRY).

If you don’t know wtf seeding, peeling, juicing and chopping a tomato means check out this really simple tutorial, here. Discard the seed/pulp mixture and chop up the remaining tomato to complete step 4.

Pss: The tomato mixture is the tomatoes and the next 5 ingredients.

Would I Make It Again?

Hell yes. It was the best damn sauce I ever made and who doesn’t love good Tuna?!

Julia child’s tuna steak recipe

Julia Child taste test blog image

Come be my friend on Instagram. I’m hilarious.

Jiggly Japanese Cheesecake by McCormick

Another Friday, another opportunity to bake something new this weekend. Last weekend I made an attempt to make the jiggle cheesecake GIFs were made for…but let’s recap last weeks post about cannolis just in case you weren’t here.

I’m not a food blogger. I share recipes I’ve tried and if I’d make them again. I hate the word foodie and hefty paragraphs filled with adjectives about the recipe, and photographs that have dusted flour and cutting boards.

You can expect the recipe I used, helpful tricks or what not to do and a couple (probably one) real shots of what it looked like when my bake came out of the oven.

Here’s the recipe I tried by McCormick:

The Recipe:

Servings
  • 8 large egg yolks
  • 1 package (8 ounces) cream cheese
  • 1/2 cup (1 stick) butter
  • 1/2 cup milk
  • 2 tablespoons pure vanilla extract
  • 1/4 cup flour
  • 1/4 cup cornstarch
  • 12 large egg whites
  • 1/2 teaspoon cream of tartar
  • 1/2 cup sugar
  1. Preheat oven to 320°F. Line bottom of 9×3-inch round cake pan with parchment paper. Line sides of pan with a 4-inch wide strip of parchment. (You should have about 1 inch of paper extending above the top of the pan.) Set aside.

  2. Test Kitchen Tip: To prepare using a 9-inch springform pan, line with parchment as directed in Step 1. Place pan in center of large sheet of heavy-duty foil. Wrap, making sure bottom and sides are completely covered, to keep water from soaking into cake batter.

  3. Beat egg yolks in large bowl with wire whisk; set aside. Mix cream cheese, butter and milk in small saucepan on medium heat until melted and smooth; remove from heat. Gradually add cream cheese mixture to egg yolks, stirring constantly with wire whisk. Stir in extract until completely smooth.

  4. Sift flour and cornstarch into batter mixture, stirring constantly with wire whisk until well blended.

  5. Beat egg whites and cream of tartar in separate large bowl with electric mixer on medium speed until soft peaks form. (If using a freestanding mixer, use wire whisk attachment.) Increase speed to medium-high. Gradually add sugar, beating until sugar is dissolved and stiff peaks form.

  6. Gently stir in 1/4 of the egg white mixture into the batter mixture; repeat until fully incorporated. Pour batter into prepared pan and gently tap pan on the counter to remove any large air bubbles.

  7. Place pan in large roasting pan or dish. Pour enough hot water into roasting pan to cover about 1 inch from bottom of cake pan. Bake 25 minutes. Reduce heat to 280°F. Bake 55 minutes longer or until cake has risen and the top is golden brown.

  8. Remove from oven. Let stand in water bath until cool enough to handle. Remove from water bath. Invert cake onto large plate or cutting board to remove parchment paper. Carefully flip cake onto serving platter. Sprinkle top with powdered sugar and serve warm with fresh berries and whipped cream, if desired.

  9.  

My Findings:

  1. I think a Slow Cooker Liner by Reynolds wrap would work better than aluminum foil. I didn’t have any on hand so I used foil but remember hearing this trick from a friend.
  2. My cake rose quite a bit, and I think it’s because I overwhipped the egg whites…maybe. So be careful you don’t overwhip, it’s easy to do in a freestanding mixer.
  3. I did use the McCormick pure vanilla extract and I think it really did make a difference in taste (especially since I didn’t have any whipped cream or berries during my taste test.

Would I Make It Again?

Only if someone requested the jiggle. The cheesecake was good, but my taste prefers the good old dense New York style cheesecake. I missed having crust, but spending 10-minutes jiggle testing it was fun.

McCormick Jiggly Japanese Cheesecake

PS: I didn’t have a roasting pan or pyrex dish big enough to dunk my springform pan in so I used my cast iron skillet and kept my oven temp a little hotter than suggested.

Cheesecake Recipe quote
Come be my friend on Instagram. I’m hilarious.

Bakeathon 2018 Recipes

Yesterday was the fourth annual Christmas Bakethon hosted at my MIL’s. She and I started this tradition the first Christmas I lived in California and every year we’ve made it a bigger and bigger deal.

In honor of my husband’s Grandpa Roy, we chose only Chevron recipes out of his 1970s field manual (plus a few of our own favorites). After this year’s Bakeathon with a total of 641 flipping cookies later. This is what we’ve got.

1. Pecan Bars
2. Peanut Butter Oatmeal Raisin
3. Magic Bar Cookies
4. Persimmon Cookies
5. Sugar Crisps
6. Crunch Drops
7. Nut Butter Balls
8. Peanut Butter Cookies
9. Date Pinwheel Cookies
10. Brown Butter Cookies
11. Chocolate Crinkle
12. Scotch Shortbread
13. Peanut Butter Kisses
14. Snowball Cookies
15. Muffin Tops because the Seinfeld jokes will never end and the MIL has a muffin top only pans.

Anyways, I’ve gotten a few requests for the recipes so I wanted to share them here.

Crunch Drops – 2c. sifted flour, 1 tsp. baking soda, 1/2tsp. salt, 1c shortening, 1c. brown sugar, 1c. granulated sugar, 2 eggs, 1tsp. vanilla, 2c. oatmeal, 2c. rise crispy cereal, 1c. shredded coconut.

Sift flour, salt, and soda together. Cream shortening until fluffy.  – Add sugar gradually, add eggs one at a time, beat well. – Stir in flour and vanilla. Add in other ingredients and mix well. – Bake 12 – 15 minutes, oven 350 degrees. (My father-in-law thinks adding raisins would be good)

Nut Butter Balls – 1c. butter or margarine, 1/2c. granulated sugar or confectioner’s sugar, 1/2 tsp. salt, 1tsp. almond extract (can sub. 2tsp. vanilla), 2c. sifted flour, 1-2c. chopped nuts.

Mix butter with sugar until very light and fluffy. Add salt, extract, flour, nuts, mix well. Refrigerate until easy to handle shape dough into 1-inch balls or 1×2 crescents. Place on ungreased cookie sheet and bake 12-15 minutes at 350 degrees. While cookies are warm, roll in granulated or confectioner sugar, fine cookie crumbs or cinnamon sugar. 

Date Pin-Wheel Cookies – 2c. brown sugar, 1c. shortening, 2 eggs, 4 c. flour, 1tsp.baking soda, 1tsp. nutmeg, 1tsp. cinnamon, 7oz. dates, 1/2c. water, 1c. sugar.

Cream brown sugar and shortening together, add the 2 eggs. – Sift together flour, baking soda, nutmeg, and cinnamon. – boil water, sugar, and dates until it’s pudding consistency. Roll into 2-inch rolls to resemble jelly roll. Put in freezer. SLice frozen and bake at 375-degrees for 15 minutes.

Pecan Bars –  1 yellow cake mix, 1/2c. butter, melted, 1 egg, 1c. chopped pecans.

Measure out 2/3cup of cake mix and save for filling. Combine remainder of cake mix, butter, and egg; mix until crumbly. Press into greased 9×13 pan. Bake at 50 for 15-20 minutes or until golden brown. Spread filling* over this while it is hot. Bake at 350 for 30-35 minutes or until it is set. *filling 2/3c. reserved mix, 1/2c. brown sugar, 1-1/2c. dark corn syrup, 1tsp. vanilla, 3 eggs. Combine and beat for 1-2 minutes. 

Persimmon Cookies – 1/2c. margarine, 1/2c. granulated sugar, 1/2c. brown sugar, 1 egg, pulp from one very ripe persimmon, 1c. flour, 1/2 tsp. baking soda, 1/2tsp. salt, 1/2tsp. cinnamon, 1/4tsp. nutmeg, 1-1/2c. oatmeal, 1/2c. nuts.

Cream margarine and sugars together. Add egg and persimmon pulp. Sift flour, soda, salt, cinnamon, and nutmeg together and then add gradually to other mixture. Beat until well blended and then add oatmeal and nuts. Drop by teaspoonsful on oiled cookie sheet. Bake at 350 for approximately 12 minutes. 

Sugar Crisps – 1 cake yeast, 1/4c. lukewarm water, 3 1/2c. sifted flour, 1 1/2 tsp. salt, 1/2c. butter, 1/2c. shortening, 2 beaten eggs, 1/2c. sour cream, 3tsp. vanilla, 1 1/2 cups sugar.

Sofen yeast in water. sift flour with salt; cut in butter and shortening. Blend in eggs, sour cream, 1 tsp. of vanilla, softened yeast. Mix well. Cover; chill at least 2 hours. Mix sugar and remaining vanilla. Sprinkle board with about 1/2 cup of mixture. Roll out half of the dough to a 16 x 8-inch rectangle, sprinkle with 1tsp. vanilla. Fold one end of dough over the center. Fold opposite and over to make three layers. Turn 1/4 way round and repeat rolling and folding twice, sprinkling board with additional vanilla sugar as needed. Roll out about 1.4 inches thick. Cut into 4×1 strips; twist each strip 2 or 3 times. Place on ungreased baking sheets. Repeat entire process with remaining dough. Bake in moderate oven 375 for 15-20 minutes. 

Magic Cookie Bars – 1/2c. butter or margarine, melted, 1-1/2c. graham cracker crumbs, 1c. chopped nuts, 1c. chocolate pieces, 1-1/3c. flaked coconut, 1 can sweetened condensed milk.

Pour melted butter or margarine onto the bottom of a 13x9x2 inch pan. Sprinkle crumbs evenly over melted butter. Sprinkle nuts evenly over crumbs. Scatter chocolate pieces over nuts. Sprinkle coconut evenly over chocolate chips. Pour sweetened condensed milk evenly over coconut. Bake at 350 for 25-minutes or until lightly browned on top. Cool for 15 before cutting into squares. 

If you bake any of these, show me your bakes! Take a picutre and tag (@sjrandol) me on Instagram.


Come be my friend on Instagram, I’m on Facebook but I think I play better on IG, lol. I also just launched a podcast centered around getting to know our homeless youth in hopes to better understand how to stop it by getting to know the young people who survived it. Listen to the very first episode, here.  

The Best Carrot Cake Recipe I’ve Ever Frickin Eaten and Made

This is the best carrot cake recipe I’ve ever frickin eaten and made, hand to the dessert Gods. I had someone who hates ‘vegetable cake’ beg to take some home, a woman who isn’t a fan of super sweet desserts rave about its taste, and someone who was strictly doing keto practice the 80/20 rule and had a taste after everyone at the table told her it would be worth it.

That’s how good this recipe is, seriously.

We were having a birthday party at the office for a coworker and I opted to make her favorite cake to celebrate. If the previous paragraph didn’t convince you, it was a huge hit and I highly recommend it.

Here are some tips based off my first time baking it:

  1. Make sure the cake is level in the pie tins. Slam it straight down on the counter a few times to make sure it’s even, otherwise, you’ll end up with a cake that looks drunk.
  2. I didn’t use all of the glaze to soak each layer, it was way too hard to get out of the tins when I tried to soak all of it into the cake. I’d guess I used about half the second time around, and while it was still very wet, it was manageable.
  3. A rubber spatula and butter knife work just as well to ice the cake, don’t worry about not having all the fancy equipment. My double broiler was a pot of boiling water and a glass bowl on top, you can do it!

This is what mine looked like via my iPhone, haha.

photo.jpg

PS: yes, I used my big Tupperware container as a cake carrier.

Here is the recipe that I think was published in Southern Living but made famous by Chrissy Teign and I found here.

Cake:
2 cups all-purpose flour
2 tsp. baking soda
½ tsp. salt
2 tsp. ground cinnamon
3 large eggs
2 cups sugar
¾ cup vegetable oil
¾ cup buttermilk
2 tsp. vanilla extract
2 cups grated carrot
1 (8-oz.) can crushed pineapple, drained
1 (3 ½-oz.) can flaked coconut
1 cup chopped pecans or walnuts

Buttermilk Glaze:
1 cup sugar
1 ½ teaspoons baking soda
½ cup buttermilk
½ cup butter or margarine
1 tbsp. light corn syrup
1 tsp. vanilla extract

Cream Cheese Frosting:
¾ cup butter or margarine softened
1 (8-oz.) package cream cheese, softened
1 (3-oz.) package cream cheese, softened
3 cups sifted powdered sugar
1 ½ tsp. vanilla extract

Instructions:

  1. Preheat oven to 350°F and line 3 (9-inch) round cake pans with wax paper; lightly grease and flour wax paper. Set pans aside.
  2. Stir together first 4 ingredients.
  3. Beat eggs and next 4 ingredients at medium speed with an electric mixer until smooth. Add flour mixture, beating at low speed until blended. Fold in carrot and next 3 ingredients. Pour batter into prepared cake pans and bake at 350° for 25 to 30 minutes or until a wooden pick inserted in center comes out clean.
  4. Make the glaze: Bring all ingredients to a boil in a large Dutch oven over medium-high heat. Boil, stirring often, 4 minutes. Remove from heat, and stir in vanilla.
  5. Make the frosting: Beat butter and cream cheese at medium speed with an electric mixer until creamy. Add powdered sugar and vanilla; beat until smooth.
  6. Remove cakes from the oven and drizzle buttermilk glaze evenly over layers; cool in pans on wire racks 15 minutes. Remove from pans, and cool completely on wire racks. Spread frosting between layers and on top and sides of cake.

Hope you enjoy! If you make it, let me know how it comes out and share a picture in the comments.


Come be my friend on Instagram, I’m on Facebook but I think I play better on IG, lol. I also just launched a podcast centered around getting to know our homeless youth in hopes to better understand how to stop it by getting to know the young people who survived it. Listen to the very first episode, here.