Graham Cracker Rolls

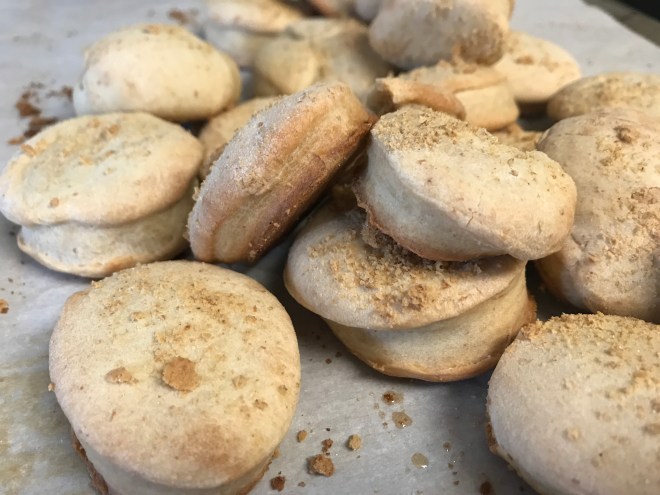
Who loves graham crackers? I do! Who loves bake fails? I do! The last couple of months I’ve been sharing recipes with successful bakes, so I thought it was about time to share a huge fail recipe. My bread never rose, I persevered to see how they’d come out regardless and I made rocks.

My awful rock rolls are pictured below, they’re pretty terrible. It’s laughable. I’m sharing the process anyway.

But first, a quick reminder I’m not a food blogger. There will be no flour-dusted cutting board photos in-between hefty paragraphs filled with adjectives. The word foodie sends an awful noise of nails on a chalkboard down my spine.

I only want to share the recipe and what I learned when baking or cooking it for the first time. The act of making food for others is how I show love, and it’s my fun time. Trying to make something for the first time is always exciting for me because you either nail it or you don’t.

Today’s Taste Test recipe is from Southern Living. Here we go!

THE RECIPE:

  • 1 envelope active dry yeast
  • 1/2 cup warm water (100° to 110°)
  • 1/4 cup plus 2 1/2 tsp. sugar, divided
  • 1 large egg
  • 1/4 cup vegetable shortening
  • 1 teaspoon table salt
  • 1/2 cup boiling water
  • 2 1/2 cups all-purpose flour
  • 3/4 cup graham cracker crumbs, divided
  • Parchment paper
  • 3 tablespoons butter, melted
  1. Combine first 2 ingredients and 1 tsp. sugar; let stand 5 minutes.
  2. Beat egg, shortening, salt, and 1/4 cup sugar at medium speed with a heavy-duty electric stand mixer until creamy. Add boiling water; stir until shortening melts. Stir in yeast mixture. Stir flour and 1/2 cup crumbs into egg mixture.
  3. Place dough in a lightly greased (with shortening) bowl; cover, and chill 8 to 24 hours.
  4. Punch dough down. Turn dough out onto a lightly floured surface, and knead 4 or 5 times. Roll to 1/2-inch thickness. Cut dough into rounds with a 1 1/2- to 2-inch round cutter, rerolling scraps twice. Place rolls 1 inch apart on a parchment paper-lined baking sheet, and brush with melted butter.
  5. Stir together remaining 1/4 cup cracker crumbs and 1 1/2 tsp. sugar. Sprinkle mixture over rolls. Cover and let rise in a warm place (80° to 85°), free from drafts, 45 minutes to 1 hour or until doubled in bulk.
  6. Preheat oven to 350°. Bake, uncovered, 15 to 18 minutes or until golden.

MY FINDINGS:

  1. It’s really important to care about the temperature of the water to dissolve the yeast.
  2. Do not over knead the dough and cover it properly (tight) so the air doesn’t get to it. I think too much air got to my dough and it wasn’t able to rise. I had the wannabe plastic wrap that didn’t stick to the bowl and hardly covered the top of the bowl.
  3. After the chilling process if your dough hasn’t risen, don’t bother continuing steps four through six, unless you want to be twins…

WOULD I MAKE IT AGAIN?

Yes. I didn’t get to taste them because who wants to eat rocks? And I love graham cracker anything.

If you make them this weekend, share your pictures in the comments or tag me in your post if you share on Instagram @sjrandol.

graham cracker roll taste test recipe

COME BE MY FRIEND ON INSTAGRAM. I’M HILARIOUS.
OR
BE MY PENPAL/DEAR DIARY SERIES 👇👇 & SIGN UP VIA THE LINK

eepurl.com/dienvj

The Best Cafe Du Monde Beignet Copycat Recipe

When I say I found the best Cafe Du Monde Beignet copycat recipe, I am not just saying it to get clicks. I have been looking for good beignets ever since I went to Mardi Gras back in 2015 with a girlfriend.

I used to get really excited when I’d see a restaurant with beignets on its dessert menu, but after a number of flat donut disappointments, I became extremely jaded. “Yeah, let’s see what their definition of a beignet is…”

Nothing will ever compare to the experience I had in New Orleans, but the days of dismay are OVER. I’m going to ruin the ending and tell you, these are flipping worth it!

But first, let’s recap in case you don’t know my rules…

I’m not a food blogger. I share recipes I’ve tried and if I’d make them again. I hate the word foodie and hefty paragraphs filled with adjectives about the recipe, and photographs that have dusted flour and cutting boards.

You can expect the recipe I used, helpful tricks or what not to do and a couple (probably one) real shots of what it looked like when my bake came out of the oven.

THE RECIPE:

  • 3/4 cup warm water (105 to 110 degrees F)
  • 1 1/4 teaspoons active dry yeast
  • 1/3 cup granulated sugar
  • 1/2 cup whole milk
  • 1 egg, beaten
  • 3/4 teaspoon salt
  • 18 ounces (3 1/2 cups) all-purpose flour
  • 2 tablespoons vegetable shortening, melted
  • Cottonseed oil for frying
Dust with
  • Powdered sugar


  1. Dissolve the yeast and sugar in the warm water in a large mixing bowl, or the bowl of a stand mixer. Let the solution sit for 15 minutes and it will become foamy.
  2. Whisk in the milk, egg, and salt. Then mix in half of the flour with a large spoon. If using a mixer, use a paddle attachment on low to medium speed.
  3. Mix in the shortening.
  4. Add the remaining flour and mix with the spoon until you can use your hands, then turn the dough out onto a floured board and knead just until smooth. Don’t over-knead or the dough will get too tough. If using a mixer, swap out the paddle for your dough hook and knead just until the dough is smooth.
  5. Place the dough in an oiled bowl covered with plastic wrap or a towel in a warm spot to rise for 2 hours. The dough will double in size.
  6. Preheat 3 to 4 inches of cottonseed oil in a pan or deep fryer to 370 degrees F.
  7. On a heavily floured surface, roll out the dough until it is 1/4-inch thick. Use a pizza slicer or knife to cut the dough into 2 1/2-inch square pieces and fry 3 to 4 pieces at a time in the oil. Immediately after dropping the dough into the oil use a large spoon to gently splash hot oil over the top of each piece. after 30 to 45 seconds, flip all of the beignets over and continue to baste with the oil. After another minute or so, flip the beignets again, and continue to cook until the beignets are a deep golden brown. Continue flipping the beignets over to brown them evenly on both sides. After about 3 minutes, they should be done. Let them drain on a cooling rack or a paper towel-lined plate for a minute until you can handle them.
  8. Serve three beignets on a plate with a very heavy dusting of powdered sugar on top.

MY FINDINGS:

  1. It’s important to care about the temp of your warm water. I microwaved warm water from the tap for 15-seconds, and it was almost spot on.
  2. I couldn’t find Cottonseed oil, so I used Peanut oil because Google told me it was the closest to cottonseed…
  3. The next time I make these I’m doubling the size in the name of authenticity.

WOULD I MAKE IT AGAIN?

Hell yes. I served with a raspberry sauce because SCREW THOSE WHO SERVE IT WITH COFFEE FLAVORED WHIPPED CREAM! I put one container of raspberries, half a lemon’s juice and 1/4 cup of sugar in a medium saucepan and boiled it down on low heat for 15(ish) minutes. I then put it through a sieve to rid the seeds and this little extra step is WORTH IT.

Have you ever had a beignet at Cafe Du Monde?

New Orleans quote

Huge shoutout to The Food Hacker for this pot of gold. You can find it, here.
COME BE MY FRIEND ON INSTAGRAM. I’M HILARIOUS.
OR
BE MY PENPAL/DEAR DIARY SERIES 👇👇 & SIGN UP VIA THE LINK

http://eepurl.com/dienvj

Poppy’s Creme Brûlée

Did you read today’s Taste Test recipe and tense up a little bit? I wonder why it’s made out to be such a difficult dessert to try, maybe it’s the fancy top hat above the ‘u’ that makes it seem way to fancy to try? Let me tell you, I’d rather make Creme Brûlée any day over that damn bread that gave me bruises!

I got this recipe from my Dad (aka Poppy). He made it on Paint maybe a decade ago and emailed it to me. I kid you not, he made it for me on Paint and it is carefully preserved in my cooking binder between two plastic sheets.

But first, let’s recap in case you don’t know my rules…

I’m not a food blogger. I share recipes I’ve tried and if I’d make them again. I hate the word foodie and hefty paragraphs filled with adjectives about the recipe, and photographs that have dusted flour and cutting boards.

You can expect the recipe I used, helpful tricks or what not to do and a couple (probably one) real shots of what it looked like when my bake came out of the oven.

The Recipe:

4 Tablespoons granulated sugar

2 1/2 cups heavy cream

6 egg yolks

1/2 teaspoon vanilla extract

What you need:

Mixing bowl, wire whip, ramekins, pyrex oven pan, heavy bottom saucepan, thermometer, torch spark, and wire sift.

  1. Gather supplies/ingredients. Get some water boiling and heat oven to 350 degrees.
  2. Heat 2 1/2 cups heavy cream in a heavy bottom saucepan until it reaches 175 – 180 degrees and remove from heat.
  3. Meanwhile place 6 egg yolks, 4 Tablespoons sugar, and 1/2 teaspoon vanilla in mixing bowl and whisk until frothy.
  4. Remove 1/4 cup of the hot heavy cream and slowly pour into egg mix while whipping vigorously to temper egg mix. Repeat with another 1/4 cup.
  5. Slowly pour entire tempered egg mix into heavy cream while whipping with might. Scrape bowl well with rubber spatula.
  6. The mixture will be frothy on top. Use a skimmer to remove the froth. Be sure to let liquids pass through simmer back into mix before dumping froth. Repeat until very little froth is left.
  7. Place 4 ramekins into your baking pan and fill pan with water until the water reaches halfway up ramekins. Pour approximately 2/3 cup of mix into each ramekin.
  8. Bake in over for 20 – 25 minutes. When sides are firm but the center is slightly jiggly the custard is done. Remove from oven and leave in water pan for 10 minutes. Place in fridge and chill for about 4 hours.

To Serve:

  • Sprinkle 2 teaspoon of sugar over top of the Brulee and lightly shake the ramekin back and forth to get an even coat.
  • Brown sugar with a torch. The tip of the flame that is yellow is the hottest part. Sugar should meet flame at top of the yellow tip. Use a right to left back and forth motion starting at the top and work your way down as sugar carmelizes.
  • Note: I like to serve it with a whipped cream rose and strawberry fan on the side or on a plate with a spoon. You can also serve whipped cream on top of Brulee wit
  • h a sprinkle of raspberries, too.

My Findings:

  1. Do not dump all of the hot heavy cream into the egg mixture, it will curdle the eggs. You need to have patience and not rush the tempering.
  2. If you don’t have a small wire sift to skim the top, use a spoon and carefully de-froth the top.
  3. The boiling water is for the water surrounding the ramekins before it enters the oven. I think the boiling water help keep it at an even temp. in the oven and it takes longer to bake if you don’t use heated water, don’t quote me but that sounds right.

Would I Make It Again?

Hell yes. It’s easier than it looks (and sounds). I remember being so nervous I was going to fuck up the tempering I was SUPER and ridiculously slow at it. I never thought the mixtures would ever be melded as one…so find a happy medium, you don’t have to be a psycho like I was the first go around and you can’t dump half or all of it in one or two shots.

Have you ever tried to make Creme Brûlée? How’d it turn out? Tell me in the comments.

Creme Brûlée quotes or sayings

Come be my friend on Instagram. I’m hilarious.
This is my Dad’s recipe that he wrote up on Paint for me some 10 years ago. I have no idea where it came from or if it has his own tweaks.


Taste Testing Mary Berry’s Victoria Sandwich​

Has anyone tried making any of the recipes I’ve shared, yet? Share it in the comment section below so I can see what everyone else is up to on the other side of this screen 😉

Today’s taste test involves another great recipe found by watching The Great British Baking Show (thanks Netflix! I was late to the GBBO craze) and it’s Mary Berry’s Victoria Sandwich recipe.

Luckily, converting this one was MUCH easier than the Povitica recipe I shared a few weeks ago due to the fact she has the ounces next to the grams and my measuring cup has the ounces listed, haha. The odds are more in your favor here.

But first, let’s recap in case you don’t know my rules…

I’m not a food blogger. I share recipes I’ve tried and if I’d make them again. The word foodie and hefty paragraphs filled with adjectives about the recipe annoy me. Oh, and photographs that have dusted flour and cutting boards.

You can expect the recipe I used, helpful tricks or what not to do and a couple (probably one) real shots of what it looked like when my bake came out of the oven.

The Recipe:

For the sponge

4 large free-range eggs

225g (8oz) caster sugar, plus extra for sprinkling

225g (8oz) self-raising flour

1 level tsp baking powder

225g (8oz) unsalted butter, softened, plus extra for greasing

For the jam

200g (7oz) raspberries

250g (9oz) jam sugar

For the buttercream

100g/3½oz unsalted butter, softened

200g/7oz icing sugar sifted

2 tbsp milk

Directions

  1. Preheat the oven to 350F. Grease and line two 8in sandwich tins: use a piece of baking or silicone paper to rub a little baking spread or butter around the inside of the tins until the sides and base are lightly coated. Line the bottom of the tins with a circle of baking paper.
  2. Break the eggs into a large mixing bowl, add the sugar, flour, baking powder and soft butter. Mix everything together until well combined. Be careful not to over-mix – as soon as everything is blended you should stop. The finished mixture should be of a soft ‘dropping’ consistency.
  3. Divide the mixture evenly between the tins. Use a spatula to remove all of the mixture from the bowl and gently smooth the surface of the cakes.
  4. Place the tins on the middle shelf of the oven and bake for 25 minutes. Don’t be tempted to open the door while they’re cooking, but after 20 minutes do look through the door to check them.
  5. While the cakes are cooking, make the jam. Put the raspberries in a small deep-sided saucepan and crush them with a masher. Add the sugar and bring to the boil over a low heat until the sugar has melted. Increase the heat and boil for 4 minutes. Remove from the heat and carefully pour into a shallow container. Leave to cool and set.
  6. The cakes are done when they’re golden-brown and coming away from the edge of the tins. Press them gently to check – they should be springy to the touch. Remove them from the oven and set aside to cool in the tins for 5 minutes. Then run a palette or rounded butter knife around the inside edge of the tin and carefully turn the cakes out onto a cooling rack.
  7. To take your cakes out of the tins without leaving a wire rack mark on the top, put the clean tea towel over the tin, put your hand onto the tea towel and turn the tin upside-down. The cake should come out onto your hand and the tea towel – then you can turn it from your hand onto the wire rack. Set aside to cool completely.
  8. For the buttercream, beat the butter in a large bowl until soft. Add half of the icing sugar and beat until smooth. Add the remaining icing sugar and one tablespoon of the milk and beat the mixture until creamy and smooth. Add the remaining tablespoon of milk if the buttercream is too thick. Spoon the buttercream into a piping bag fitted with a plain nozzle.
  9. To assemble, choose the sponge with the best top, then put the other cake top-down on to a serving plate. Spread with the jam then pipe the buttercream on top of the jam. Place the other sponge on top (top uppermost) and sprinkle with caster sugar to serve.

My Findings:

  • I had never made jam before and was super worried about it ‘setting’ so I picked up some pectin just in case and added a sprinkling of it to my mixture. I also added the sugar scoop by scoop because I wanted to control the sweetness. I ended up using a little over a half cup of sugar.
  • My piping bag was a Ziploc baggy with the corner cut off. Now, this works in a pinch but it did not give me the freedom to make those beautiful pillow clouds of buttercream you see pictured on Mary Berry’s bake.
  • Nothing with homemade buttercream is going to be awful.

Would I Make It Again?

YES. It was super simple and flipping DELICIOUS. The proper storage will keep the sponge fresh for days! I use an oversized container with a locking lid as a makeshift cake holder/saver.

eating cake quote

Come be my friend on Instagram. I’m hilarious.
Originally recipe found, here.

Tuscan Kale Soup

Usually, I’m not down for attending cooking classes at kitchen supply stores or ‘we do team building events!’ type places. The work is done for you and at some places, you can’t take the leftovers home, so if you took a 3PM class and weren’t quite hungry, you can’t take your’s home for later. Speaking from experience, bitterly.

Then I went to The Wine Artist with my MIL and they let you drink wine while making your dinner and I’m 100% certain that made the whole cooking in a group thing, more enjoyable. The menu that night was also bomb, the theme was Under The Tuscan Sun.

So, today’s Taste Test recipe you most definitely want to try this weekend is the Tuscan kale soup.

But first, let’s recap in case you don’t know my rules…

I’m not a food blogger. I share recipes I’ve tried and if I’d make them again. The word foodie and hefty paragraphs filled with adjectives about the recipe annoy me. Oh, and photographs that have dusted flour and cutting boards.

You can expect the recipe I used, helpful tricks or what not to do and a couple (probably one) real shots of what it looked like when my bake came out of the oven.

The Recipe:

1 Tablespoon olive oil

1-pound spicy Italian ground sausage

1 onion diced

2 carrots, peeled and diced

4 garlic cloves minced

1 (14.5 oz) can white cannellini beans

4 cups chicken broth

2 cups water

1 teaspoon salt

1 teaspoon pepper

1 teaspoon Italian seasoning

1/4 teaspoon red pepper flakes

1 bunch of kale, roughly chopped with stems removed

Toppings: parmesan cheese

  1. Heat oil in a large pot. Add sausage and cook until no longer pink. Add in onions and carrots and saute for a few minutes until onions are soft. Add garlic and continue to cook for a few minutes.
  2. Add in beans, chicken broth, water, salt, pepper, Italian seasoning, and red pepper flakes and stir together. Cover and bring to a boil. reduce heat and simmer for 10 minutes.
  3. Add in kale and continue to simmer for 10 minutes or until kale and vegetables are tender. Taste and adjust seasoning, as needed.

My Findings:

  • The easiest and most impressive soup you’ll ever make.
  • I ate this for lunch every day for a week, there is such thing as too much kale for the system…but I’d probably make a big batch and do it all over again #noragrets bwahaha.
  • During the class, we also pan-fried baguette slices for dunking purposes…best idea ever

Would I Make It Again?

I think you know my answer. If it rains, I’m making this soup. If I want soup, I’m making this one, and if I need to bring something somewhere and wait until last minute, I’m bringing this damn soup. SO SO good.

under the tuscan sun quote about cooking

Come be my friend on Instagram. I’m hilarious.
Originally recipe from The Wine Artist in Lake Forest, CA.

Povitica – A Croatian Sweet(ish) Bread

Have you ever made Povitica? If you’ve watched a few episodes of The Great British Baking Show you may have seen it during one of the technical challenges. It’s a “sweet’ (not if your American) dessert bread filled with a boozy, walnut, and cocoa filling.

During a Christmas gingerbread making house party, my MIL’s friend was talking about a recipe her Mom used to make when she was a kid but couldn’t remember the name, so I asked her to tell me how it tasted and the main ingredients she remembered.

It sounded a lot like the Croatian bread, Povitica. Her mother had been long gone and missed the Christmas memory, so I decided to see if this recipe was THE one with a small hope it would give her a little taste of home.

Fair warning, this isn’t for the faint of heart. It’s a pain in the ass to make, strictly based off what goes in to stretching the bread, but if you like a challenge…do it.

But first, let’s recap in case you don’t know my rules…

I’m not a food blogger. I share recipes I’ve tried and if I’d make them again. The word foodie and hefty paragraphs filled with adjectives about the recipe annoy me. Oh, and photographs that have dusted flour and cutting boards.

You can expect the recipe I used, helpful tricks or what not to do and a couple (probably one) real shots of what it looked like when my bake came out of the oven.

The Recipe:

For the dough:

300g (10½ oz) plain flour, plus extra for dusting

40g (1½ oz) caster sugar

7g salt

10g (⅓ oz) fast-action yeast

30g (1oz) unsalted butter, melted

1 large free-range egg, beaten

½ vanilla pod, split and seeds scraped out

150ml (5½ fl oz) whole milk, warmed

For the filling:

60g (2¼ oz) unsalted butter

4 tbsp whole milk

280g (10 oz) walnut pieces

½ vanilla pod, split and seeds scraped out

100g (3½ oz) caster sugar

2 tbsp cocoa powder

1 free-range egg yolk, beaten

To assemble:

15g (½ oz) butter, melted

1 free-range egg white, beaten

100g (3½ oz) icing sugar

Directions

  1. For the dough, tip the flour and sugar into the bowl of a freestanding mixer fitted with a dough hook. Add the salt into one side of the bowl and the yeast to the other. Add the melted butter, egg, vanilla seeds and warm milk and begin mixing on a slow speed. When the dough starts to come together, mix for a further 5-8 minutes on a medium speed until the dough is soft, smooth and stretchy.
  2. Tip the dough into a lightly oiled mixing bowl, cover with cling film and leave to rise until at least doubled in size – about one hour. Butter a 1kg (2lb) loaf tin.
  3. For the filling, place the butter and milk in a small pan and heat gently until the butter has melted. Remove from the heat.
  4. Place the walnuts, vanilla seeds, sugar and cocoa powder into the bowl of a food processor and blend to a sandy powder. Add the egg yolk, milk and butter mixture and pulse to combine. Set aside.
  5. To assemble, spread a clean bed sheet over a kitchen table and dust with flour. Turn the risen dough out onto the sheet and roll out the dough into a large 50x30cm (20x12in) rectangle. Brush the surface with 15g (½oz) melted butter.
  6. Dust your hands with flour and ease them underneath the dough. Using the backs of your hands, stretch the dough out from the centre until very thin and translucent (you should be able to see the sheet through the dough). The rectangle should measure approximately 1metrex60cm (40x24in).
  7. Taking care not to tear the dough, spread the filling over the dough until evenly covered. If the filling has been standing for a long time and is too thick, add a little warm milk to loosen it.
  8. Starting at the long edge of the dough, lift the sheet and gently roll the dough up tightly, like a Swiss roll.
  9. Carefully lift the dough and place one end in the bottom corner of the greased loaf tin. Ease the roll into the base of the tin to form a long ‘U’ shape, then double back laying the roll over the first ‘U’ shape to form a second ‘U’ shape on top.
  10. Place the loaf tin inside a clean plastic bag and leave to rise for one hour.
  11. Preheat the oven to 180C/160C(fan)/ 350F/Gas 4.
  12. Brush the dough with beaten egg white and bake for 15 minutes. Reduce the oven temperature to 150C/130C(fan)/300F/Gas 3 and bake for a further 45 minutes, or until golden-brown. Cover with foil if the top begins to darken too much.
  13. Remove from the oven and leave to cool in the tin for 30 minutes before turning out onto a wire rack to cool completely.
  14. Mix the icing sugar with a few drops of cold water to make a runny icing and drizzle it over the povitica. Slice and enjoy.

My Findings:

  1. May the odds be ever in your favor when converting from metric to standard. I would give you my exact measurements but the piece of paper I flipping wrote it on disappeared (I’m looking at you, Hubs!).
  2. ps: Just get a scale to weigh it out on, I had to remake the dough THREE times. Save yourself the hassle (and two or maybe three – dear Zeus – hours) and spend the $10.
  3. I used the rolling pin as long as I possibly could before I started to stretch with my palms and fingers, not back of the hands as suggested because I’m pretty sure I would still be there trying to stretch it.
  4. I think adding some cinnamon in the filling and cutting the cocoa in half might be good. Oh! And some chopped walnuts sprinkled throughout, too.
  5. Needs to be eaten with coffee or tea. It was lighter tasting than I expected which I assume is due to all the layers, but I wouldn’t consider it sweet like a Cinnabon roll. So if you’re worried it is a true (American) dessert bread, it’s not.

Would I Make It Again?

Fuck no. I’d rather make a cinnamon roll, but I would absolutely make it again if my MIL’s friend specifically asked for it next Christmas.

I made four other people taste a slice before giving it away and got no complaints, but all agreed it wasn’t as sweet as they were expecting considering it was iced.


Povitica Quote on Taste Testing Friday post on RamblinRandol

Come be my friend on Instagram. I’m hilarious.
Originally recipe found, here.

Julia Child’s Thon A La Provencale

Another Friday, another opportunity to cook something new this weekend. I got Julia Child’s Mastering The Art of French Cooking for Christmas and this weekend’s recipe to try is Thon A La Provencale which is tuna or swordfish with wine, tomatoes, and herbs.

But let’s recap in case you’re new.

I’m not a food blogger. I share recipes I’ve tried and if I’d make them again. I hate the word foodie and hefty paragraphs filled with adjectives about the recipe, and photographs that have dusted flour and cutting boards.

You can expect the recipe I used, helpful tricks or what not to do and a couple (probably one) real shots of what it looked like when my bake came out of the oven.

The Recipe:

3Lbs. fresh tuna or swordfish cut into 3/4 inch steaks
9×14 pyrex baking dish about 2.5 inches deep
1 tsp salt
2 Tb lemon juice
6Tb olive oil, more if needed
A skillet
1 cup minced yellow onions
3Lbs. fresh, ripe and red tomatoes, peeled, seeded, juiced and chopped.
2 cloves mashed garlic
1/2tsp oregano
1/4tsp thyme
1/4 tsp salt
1/8 tsp pepper
1 cup dry white wine or 2/3 cup dry white vermouth
1 to 2 Tb tomato paste for added flavor and color
1Tb meat glaze (optional)
1Tb softened butter
2 to 3 Tb chopped parsley

  1. Remove skin of the dish and cut steak into serving pieces. Blend salt and lemon juice in baking dish, then beat in the oil and pepper. Arrange the fish in the dish and baste with marinade. Cover with wax paper and marinate for 1.5 – 2 hours, turning and basting the fish with marinade several times. Drain the fish and dry it thoroughly on paper towels. Discard marinade.
  2. Saute the fish rapidly in very hot olive oil for a minute or two on each side to brown lightly. Rearrange the fish in the baking dish.
  3. Preheat oven to 350 degrees.
  4. Cook the onions slowly in the skillet for 5 minutes or until tender but not browned. Stir in the tomato pulp, garlic, seasonings, and spread the tomato mixture over the fish.
  5. Place a cover or aluminum foil over the baking dish and bring to a simmer on top of the stove. Then set in lower third of preheated oven and bake for 15 minutes. Pour in the wine and bake for 30 minutes more, turning oven down to 325 as soon as fish is simmering.
  6. Remove fish to serving platter, scraping the sauce off the fish and back into the baking dish. Keep fish warm for about 5 minutes while finishing the sauce.
  7. Boil down the sauce over high heat until it has reduced to about 2 cups. Stir in tomato paste and optional meat glaze. Simmer for a moment, and correct seasoning.
  8. Off heat, beat in the flour and butter paste, bring again to the summer for 1 minute. Stir in the chopped parsley, spoon the sauce over the fish, and serve.

My Findings:

  1. I should’ve used my cast iron skillet instead of a pyrex pan because you can’t cook glass on the stovetop. I Googled it.
  2. You must be VERY careful to not overcook the fish, tuna is SO easy to overcook.
  3. Pop your serving plater in the oven with the fish to keep warm and warm up while making the sauce.
  4. Julia suggests a chilled Rose wine or a dry white, or Riesling. We tried it with rose and I just can’t do pink wine. I’d suggest a dry white instead.

Ps: I used tuna from WholeFoods and did not opt to add in meat glaze (mostly because I hadn’t any prepared and I underestimated how much time it was going to take to cook the tuna and it was 8PM by the time we ate, both the Hubs and I were HANGRY).

If you don’t know wtf seeding, peeling, juicing and chopping a tomato means check out this really simple tutorial, here. Discard the seed/pulp mixture and chop up the remaining tomato to complete step 4.

Pss: The tomato mixture is the tomatoes and the next 5 ingredients.

Would I Make It Again?

Hell yes. It was the best damn sauce I ever made and who doesn’t love good Tuna?!

Julia child’s tuna steak recipe

Julia Child taste test blog image

Come be my friend on Instagram. I’m hilarious.

Jiggly Japanese Cheesecake by McCormick

Another Friday, another opportunity to bake something new this weekend. Last weekend I made an attempt to make the jiggle cheesecake GIFs were made for…but let’s recap last weeks post about cannolis just in case you weren’t here.

I’m not a food blogger. I share recipes I’ve tried and if I’d make them again. I hate the word foodie and hefty paragraphs filled with adjectives about the recipe, and photographs that have dusted flour and cutting boards.

You can expect the recipe I used, helpful tricks or what not to do and a couple (probably one) real shots of what it looked like when my bake came out of the oven.

Here’s the recipe I tried by McCormick:

The Recipe:

Servings
  • 8 large egg yolks
  • 1 package (8 ounces) cream cheese
  • 1/2 cup (1 stick) butter
  • 1/2 cup milk
  • 2 tablespoons pure vanilla extract
  • 1/4 cup flour
  • 1/4 cup cornstarch
  • 12 large egg whites
  • 1/2 teaspoon cream of tartar
  • 1/2 cup sugar
  1. Preheat oven to 320°F. Line bottom of 9×3-inch round cake pan with parchment paper. Line sides of pan with a 4-inch wide strip of parchment. (You should have about 1 inch of paper extending above the top of the pan.) Set aside.

  2. Test Kitchen Tip: To prepare using a 9-inch springform pan, line with parchment as directed in Step 1. Place pan in center of large sheet of heavy-duty foil. Wrap, making sure bottom and sides are completely covered, to keep water from soaking into cake batter.

  3. Beat egg yolks in large bowl with wire whisk; set aside. Mix cream cheese, butter and milk in small saucepan on medium heat until melted and smooth; remove from heat. Gradually add cream cheese mixture to egg yolks, stirring constantly with wire whisk. Stir in extract until completely smooth.

  4. Sift flour and cornstarch into batter mixture, stirring constantly with wire whisk until well blended.

  5. Beat egg whites and cream of tartar in separate large bowl with electric mixer on medium speed until soft peaks form. (If using a freestanding mixer, use wire whisk attachment.) Increase speed to medium-high. Gradually add sugar, beating until sugar is dissolved and stiff peaks form.

  6. Gently stir in 1/4 of the egg white mixture into the batter mixture; repeat until fully incorporated. Pour batter into prepared pan and gently tap pan on the counter to remove any large air bubbles.

  7. Place pan in large roasting pan or dish. Pour enough hot water into roasting pan to cover about 1 inch from bottom of cake pan. Bake 25 minutes. Reduce heat to 280°F. Bake 55 minutes longer or until cake has risen and the top is golden brown.

  8. Remove from oven. Let stand in water bath until cool enough to handle. Remove from water bath. Invert cake onto large plate or cutting board to remove parchment paper. Carefully flip cake onto serving platter. Sprinkle top with powdered sugar and serve warm with fresh berries and whipped cream, if desired.

  9.  

My Findings:

  1. I think a Slow Cooker Liner by Reynolds wrap would work better than aluminum foil. I didn’t have any on hand so I used foil but remember hearing this trick from a friend.
  2. My cake rose quite a bit, and I think it’s because I overwhipped the egg whites…maybe. So be careful you don’t overwhip, it’s easy to do in a freestanding mixer.
  3. I did use the McCormick pure vanilla extract and I think it really did make a difference in taste (especially since I didn’t have any whipped cream or berries during my taste test.

Would I Make It Again?

Only if someone requested the jiggle. The cheesecake was good, but my taste prefers the good old dense New York style cheesecake. I missed having crust, but spending 10-minutes jiggle testing it was fun.

McCormick Jiggly Japanese Cheesecake

PS: I didn’t have a roasting pan or pyrex dish big enough to dunk my springform pan in so I used my cast iron skillet and kept my oven temp a little hotter than suggested.

Cheesecake Recipe quote
Come be my friend on Instagram. I’m hilarious.